
Webhook Configuration and Testing
In this guide, we’ll be discussing how to set up your own unique URL to receive webhook events, as well as how to subscribe to events in order to test webhook functionality.
Prerequisites
A Proof organization (business or real-estate) with a billing tier that allows API key usage
Postman (to subscribe to webhook events and also validate sent events using the API)
Setting Up A Webhook URL
There are many ways to set up a webhook URL, but the quick and easy way is to simply go to https://webhook.site/webhook.site
Here, you’ll see the unique webhook URL that is already created for you to use:
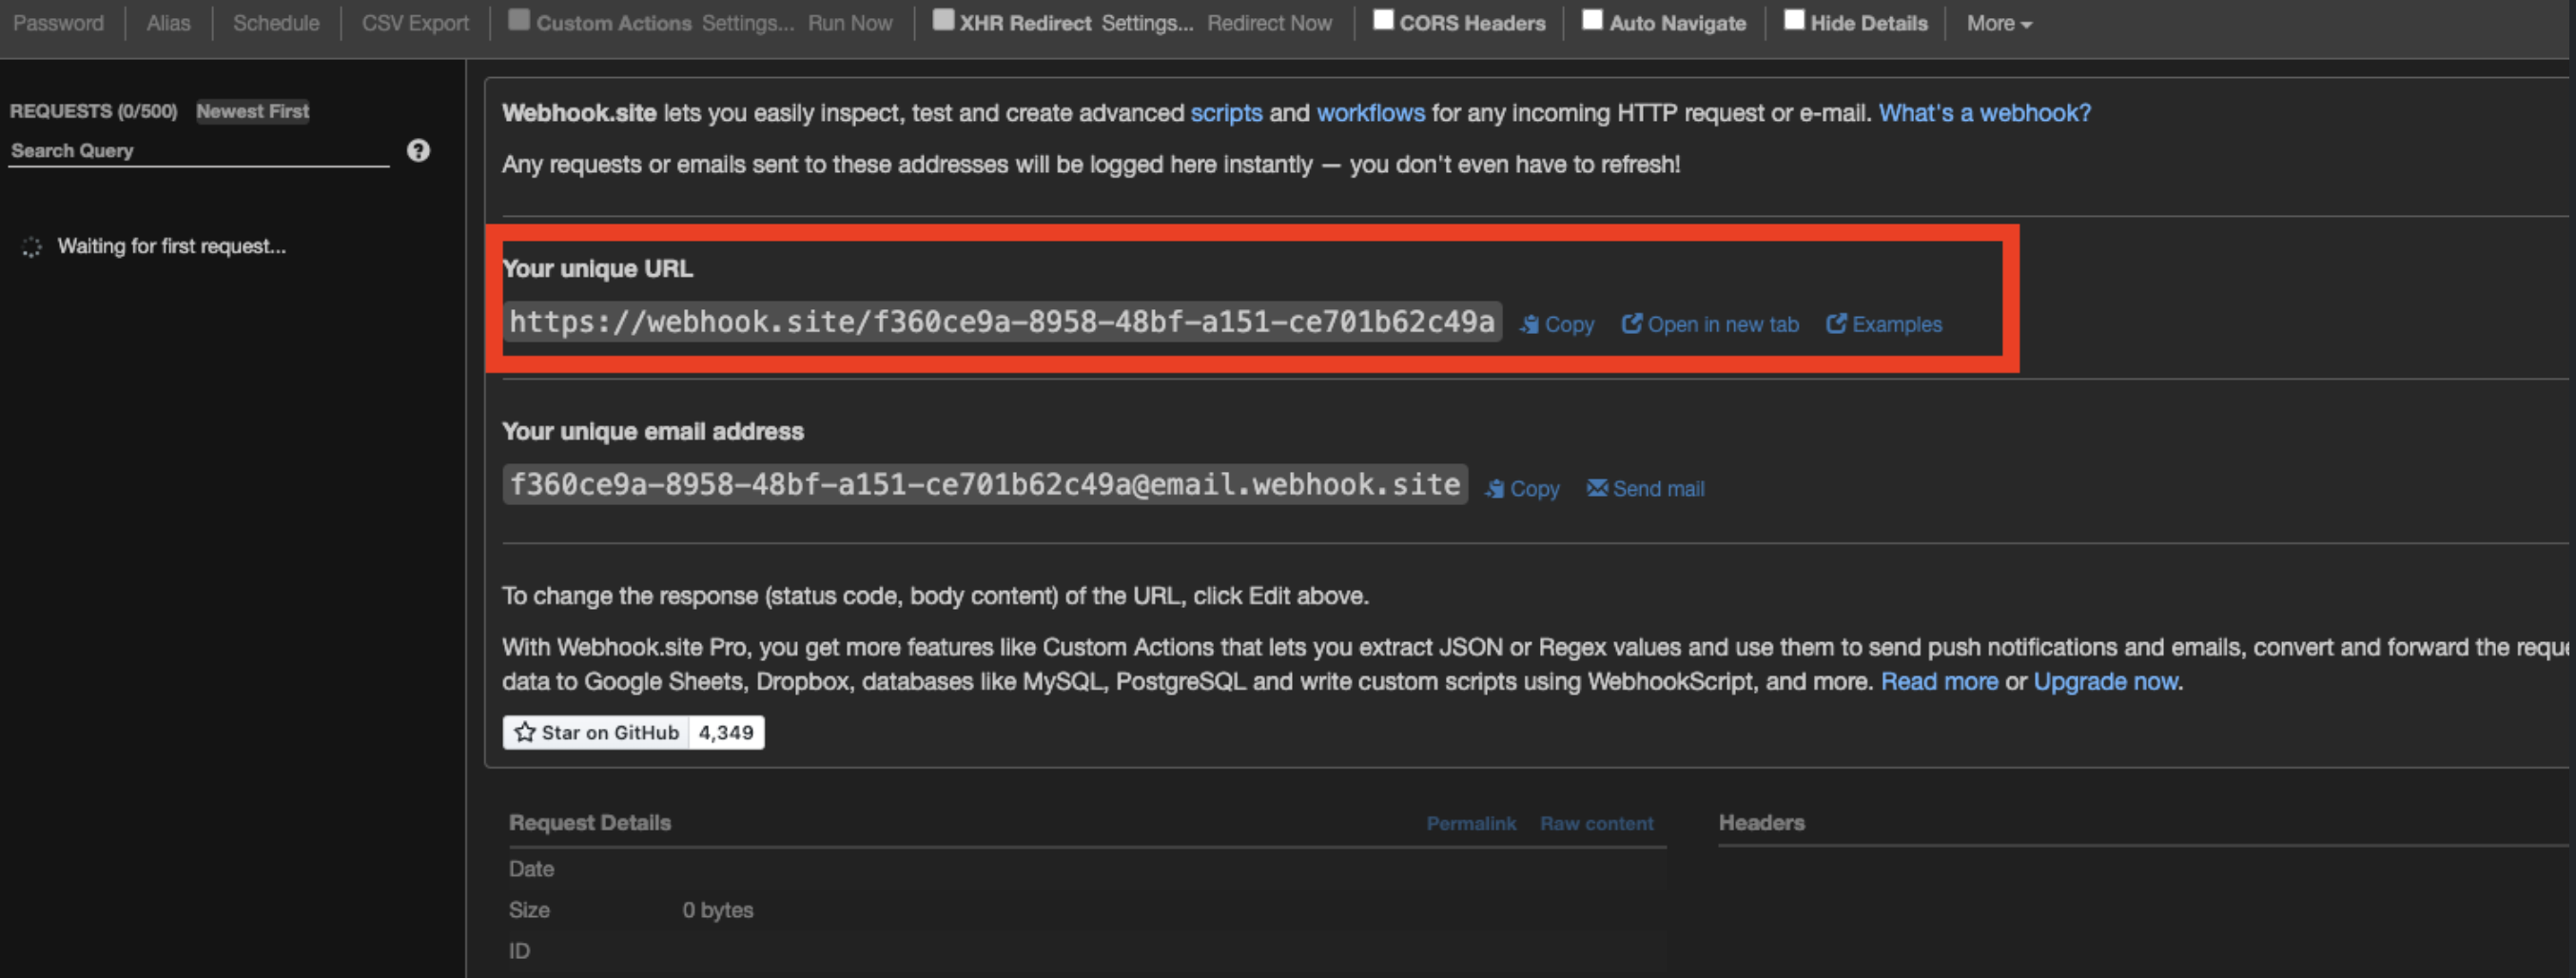
Note: To obtain a new, unique URL, click on the “New” button in the top right corner. Then click “Create” on the window that pops up.
On the left hand side of the window, you’ll see the Requests section. This is where you’ll see your webhook events as they are triggered and sent to your webhook URL:
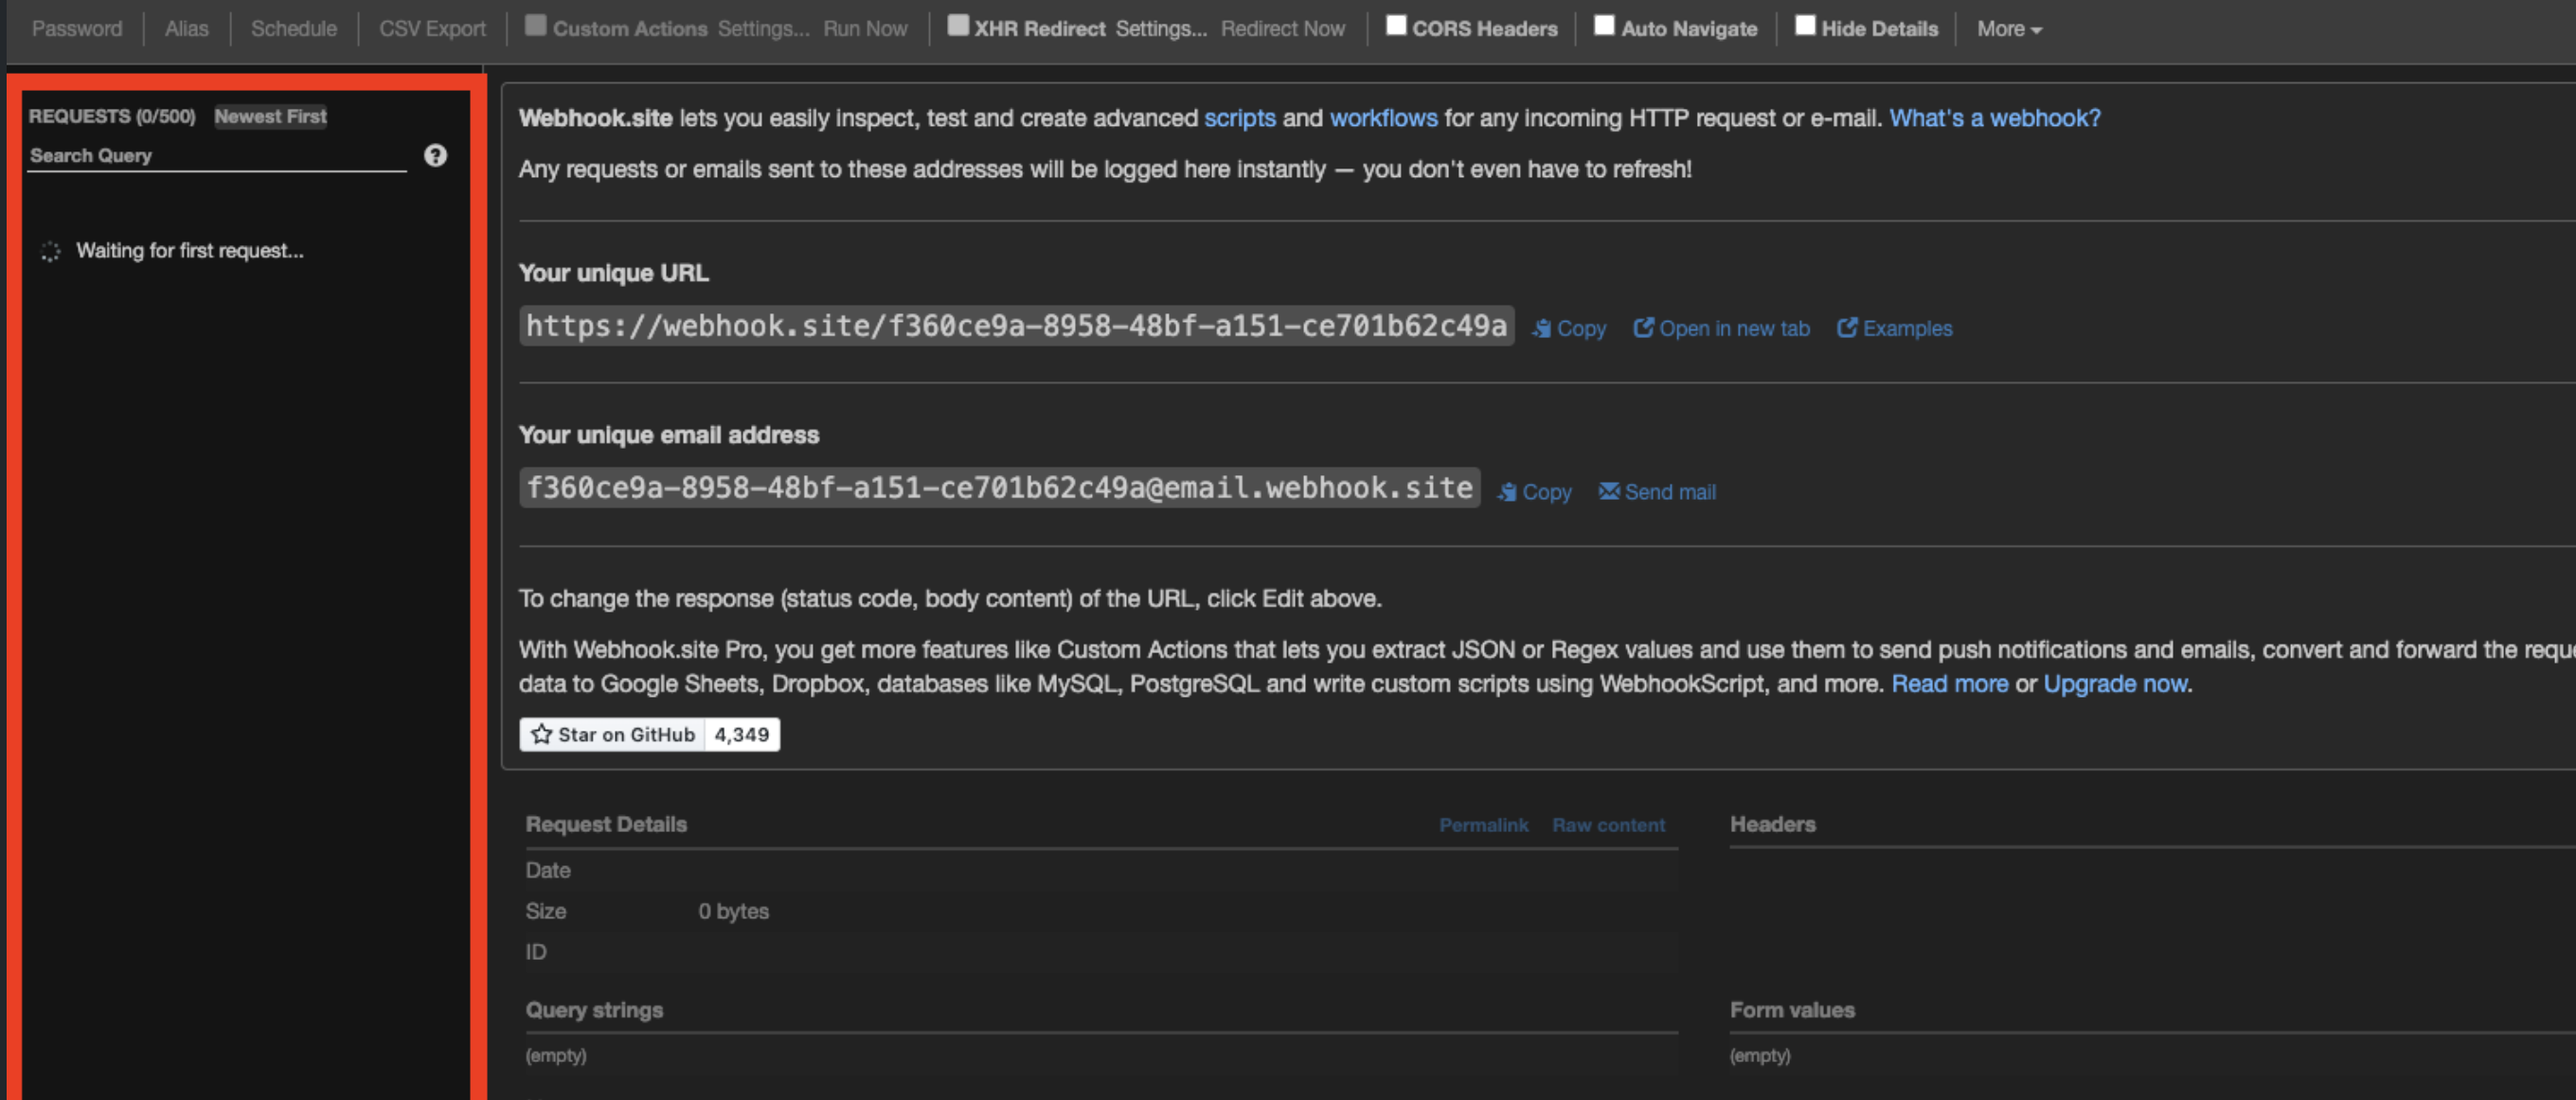
Keep this window open so you can view your events as they arrive in real time!
Subscribing To Webhook Events
Now that we have our unique webhook URL, we need to subscribe to the Proof webhook events.
For this guide, we will be working with webhook events for the Real Estate platform.
To do this, we need to make an API call to the Create Webhook V2 endpoint, specifying what events we want to subscribe to. Note: the above hyperlink is for subscribing to Real Estate webhook events. There is a separate endpoint used to subscribe to events on the Business platform.
There are a couple of ways to make these API calls, the most standard being Postman. Another way we can make these API calls is using our documentation!
Subscribing to Webhook Events Using the Dev Docs
ReadMe, where our documentation lives, provides the ability to make API calls directly from each endpoint reference. All you need is an API key and the required body parameters.
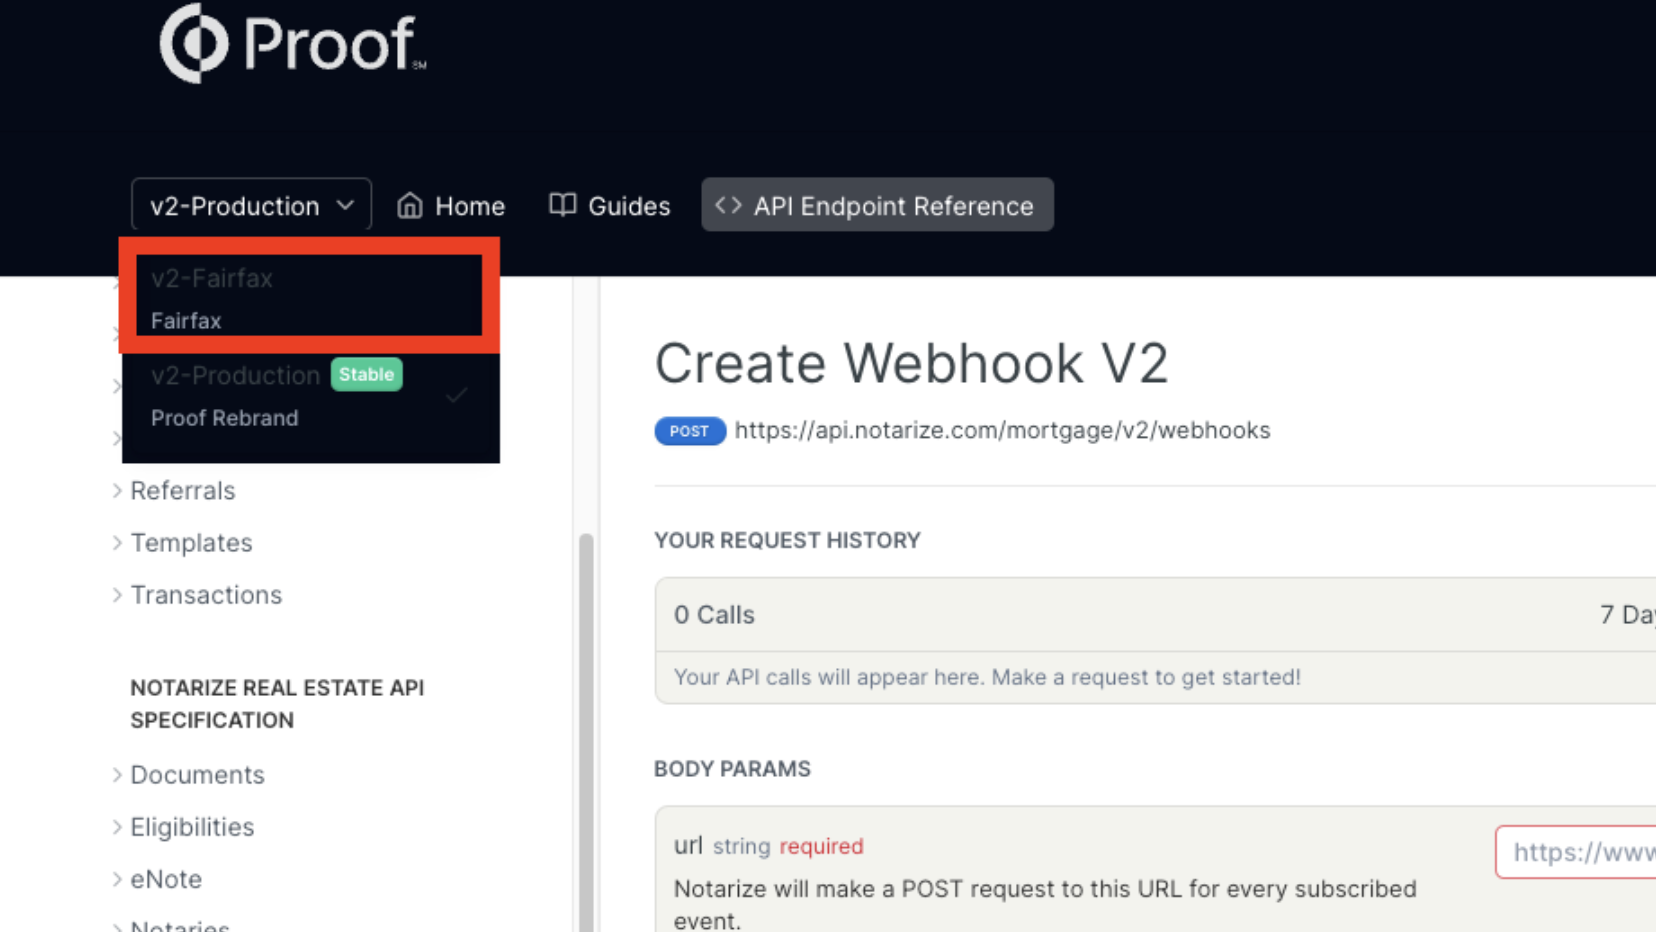
For Fairfax testing, first make sure you are viewing the Fairfax branch of our documentation:
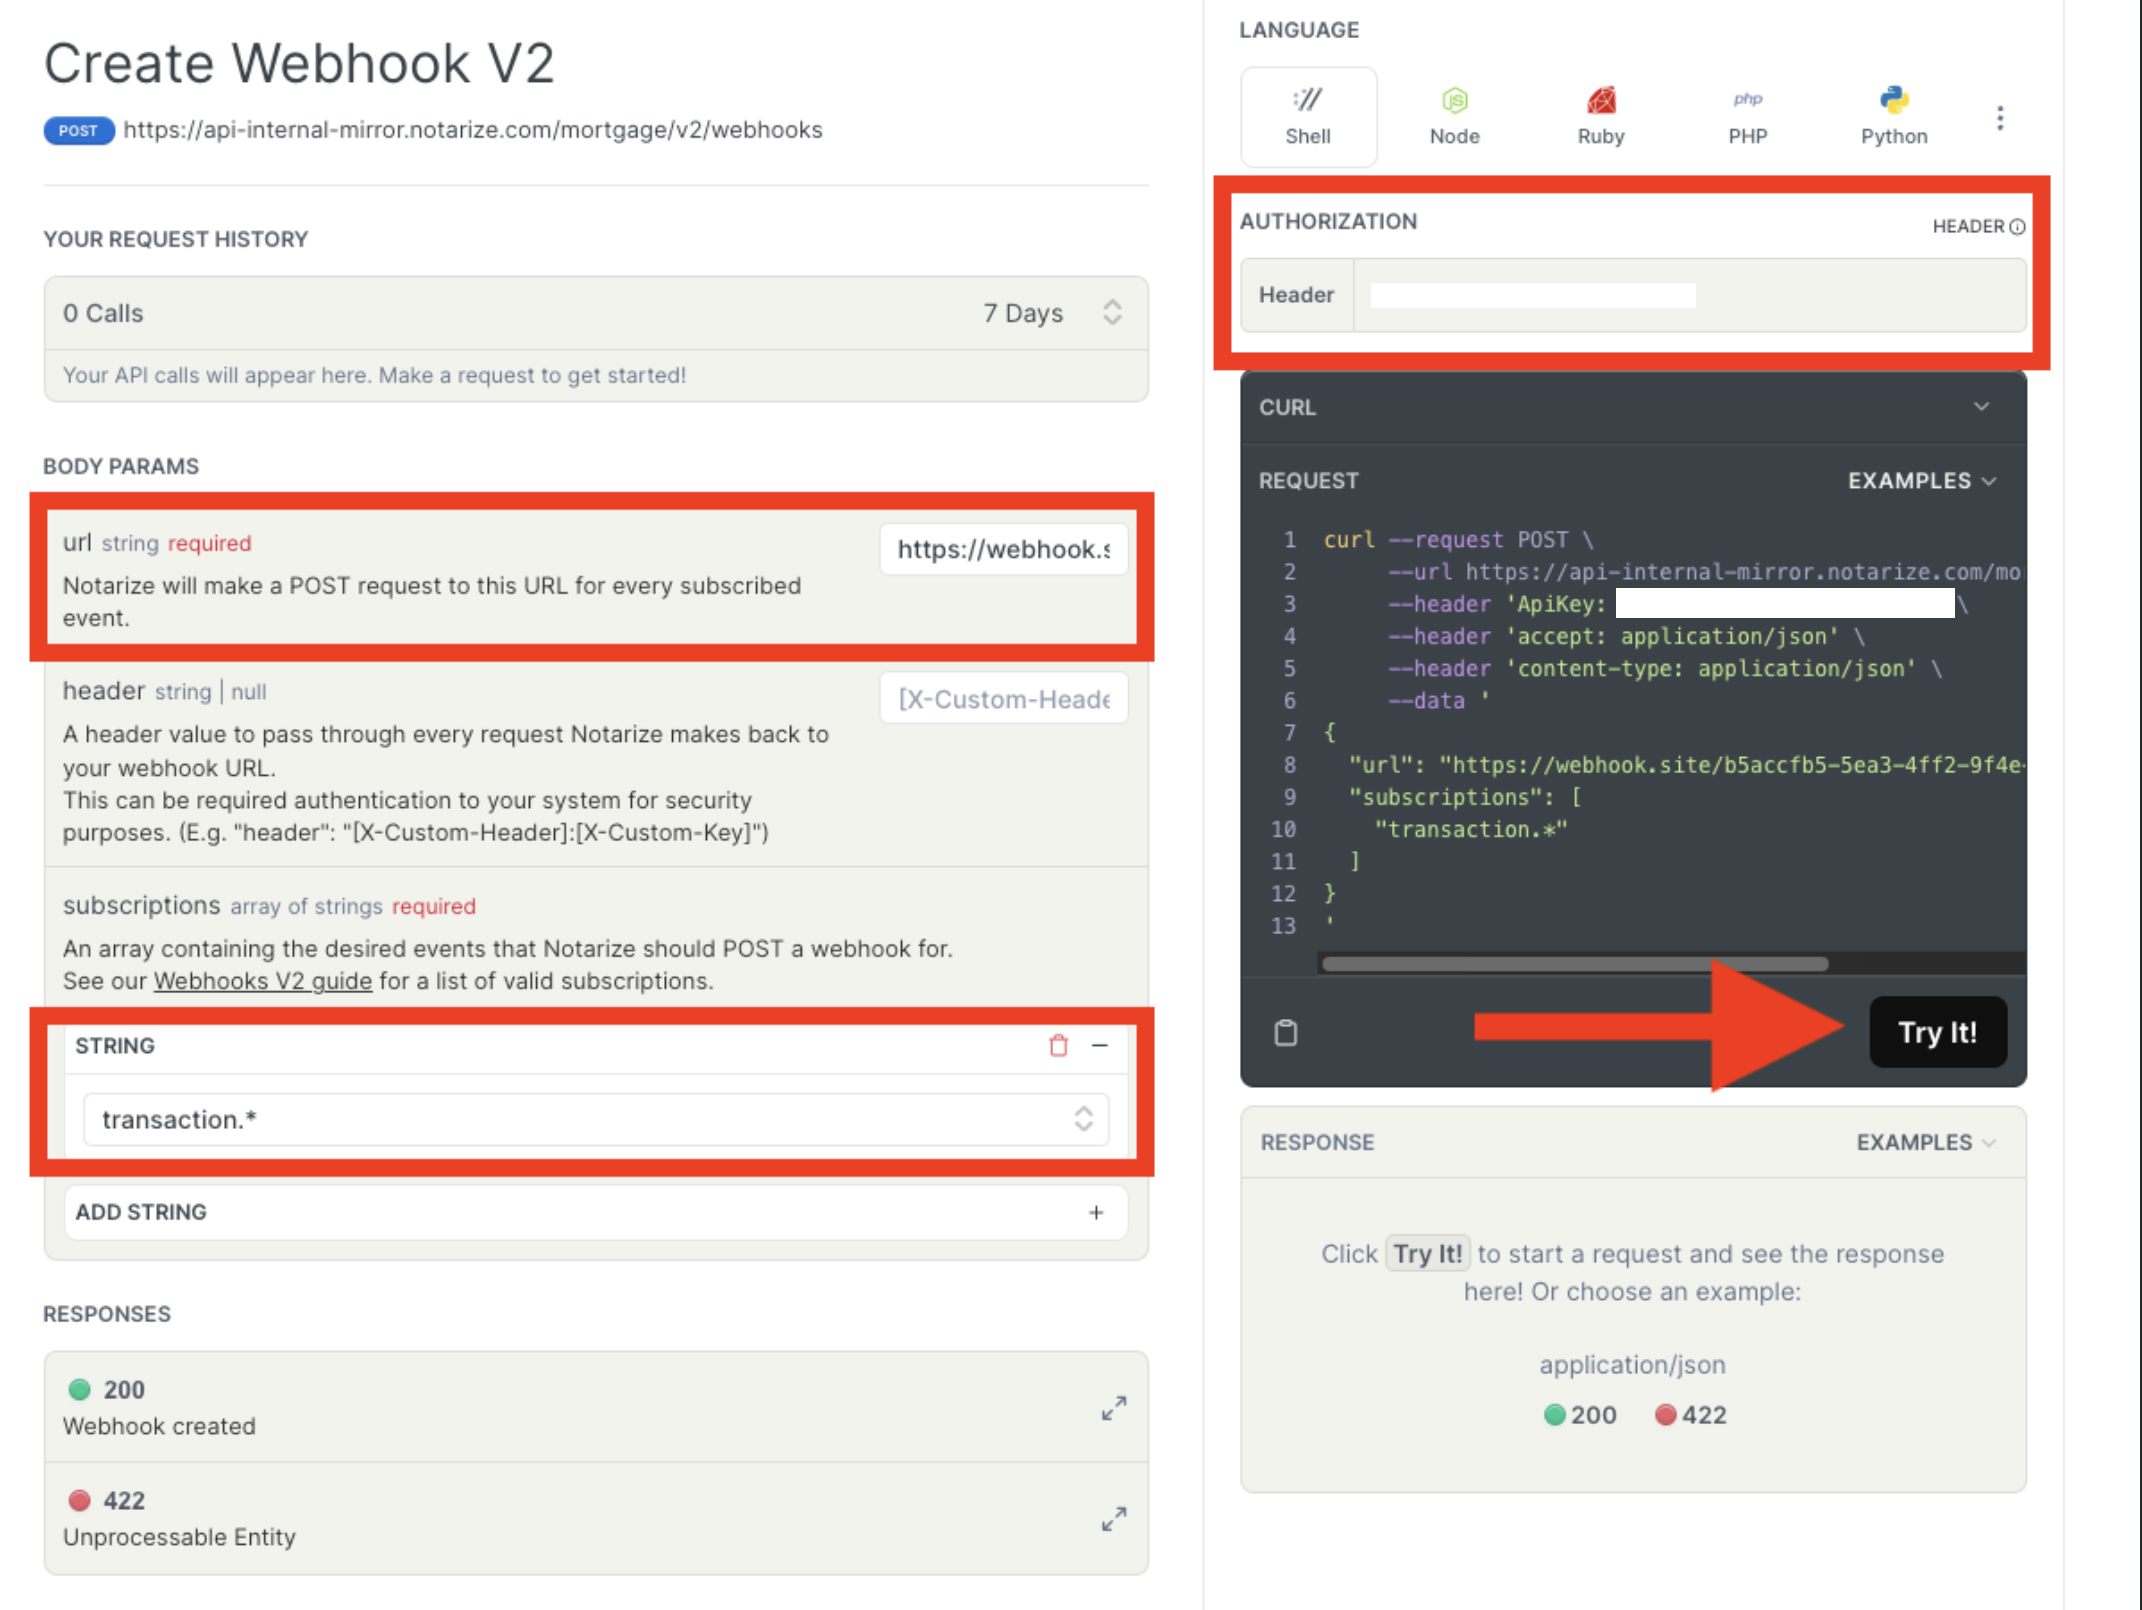
Next, we’ll plug in our API key under the Authorization section:
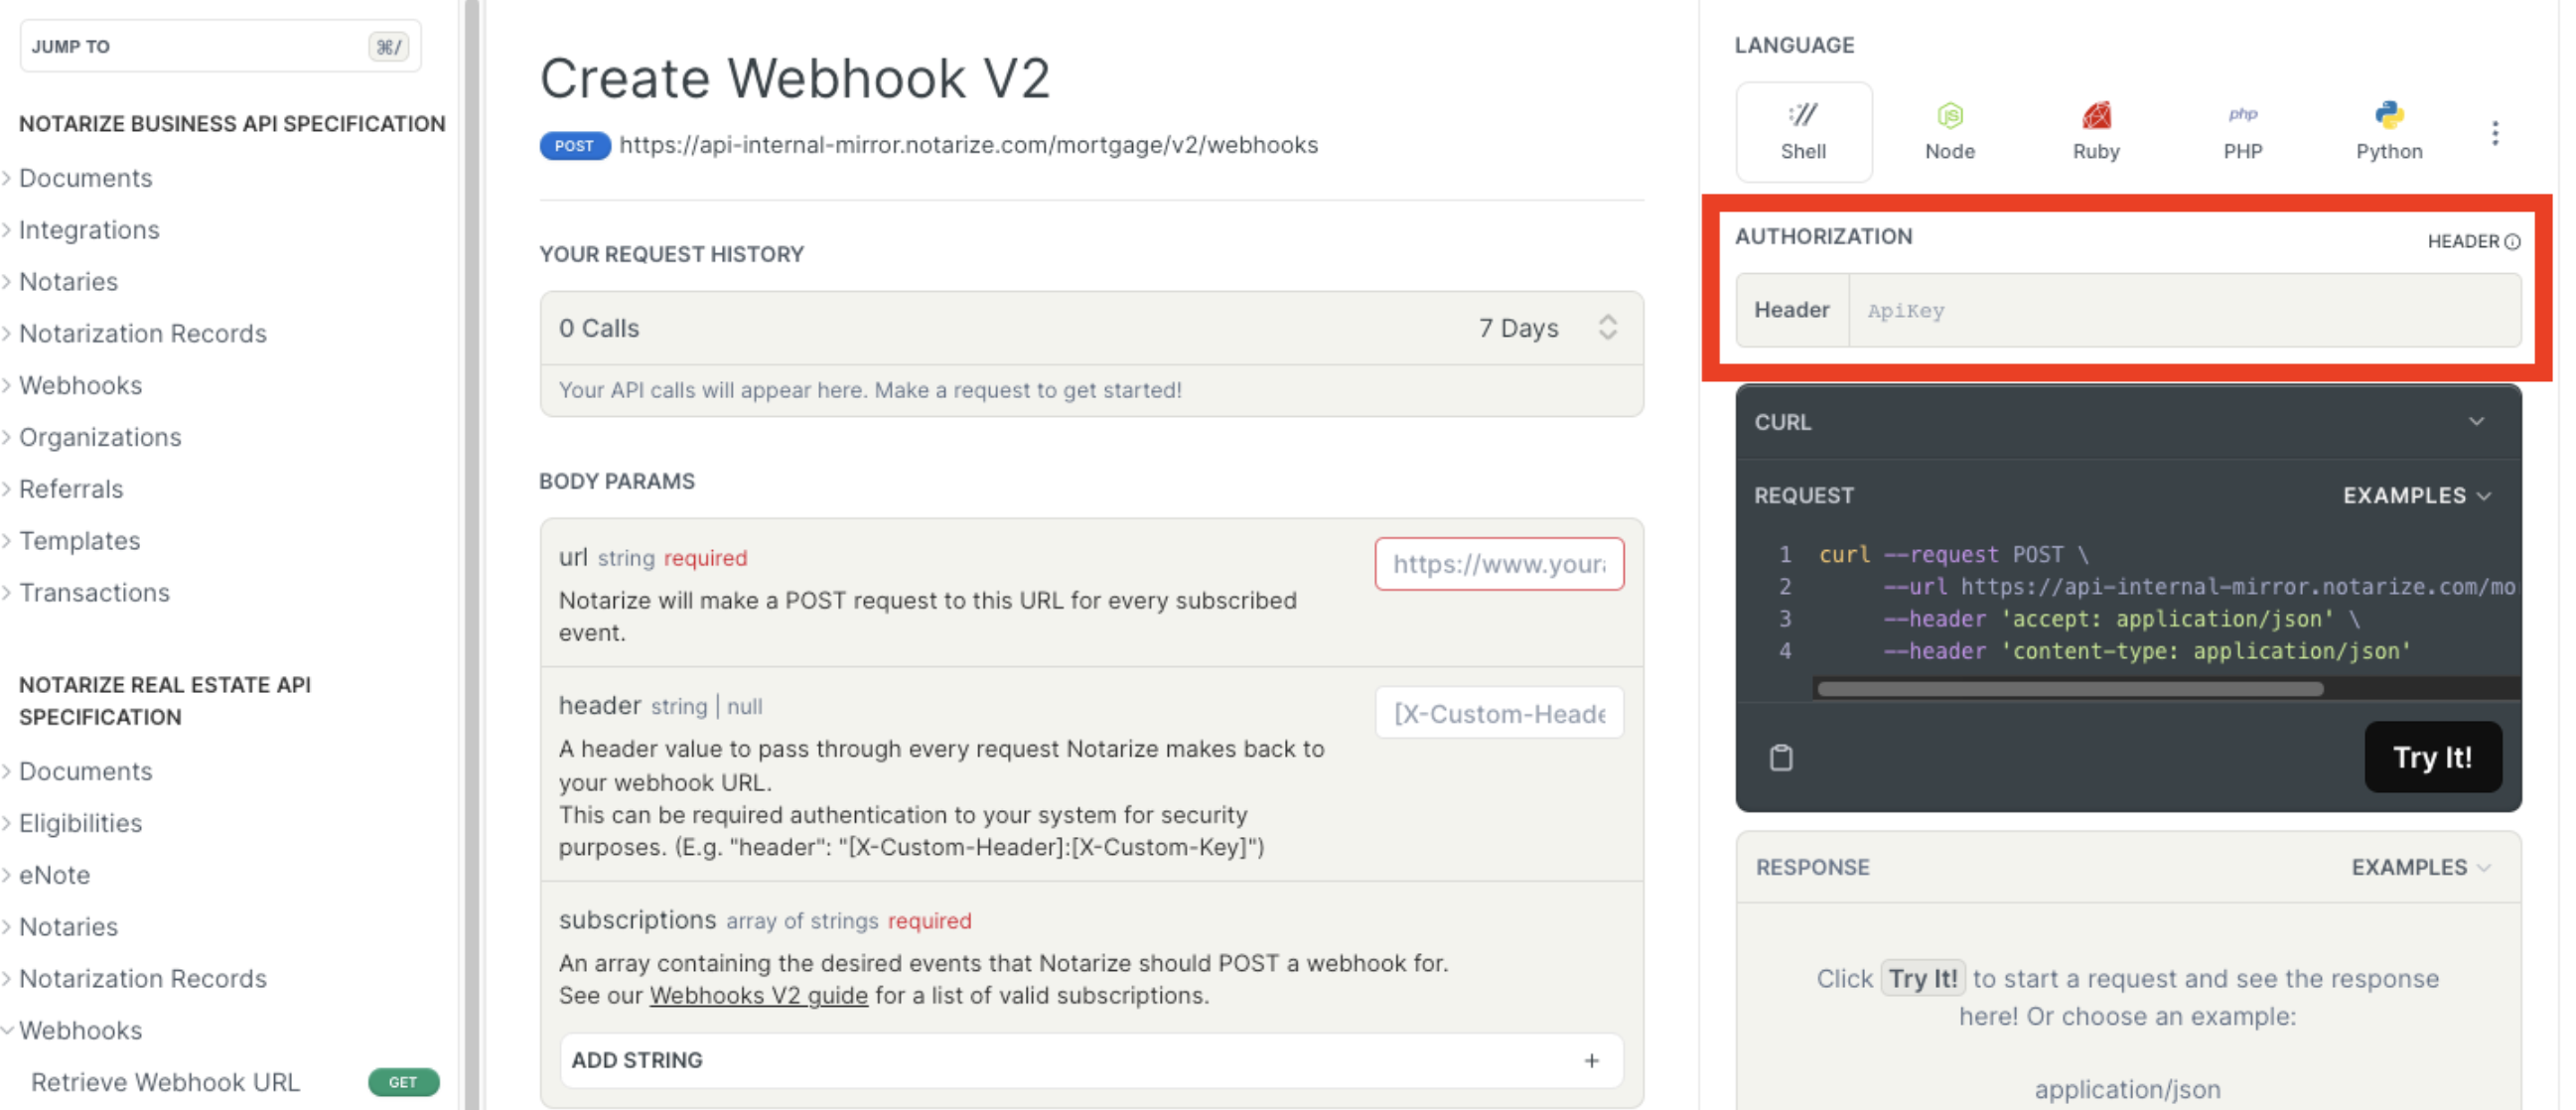
Now, copy and paste your unique webhook URL from webhook.site into the the “url” body parameter, and choose our subscriptions:
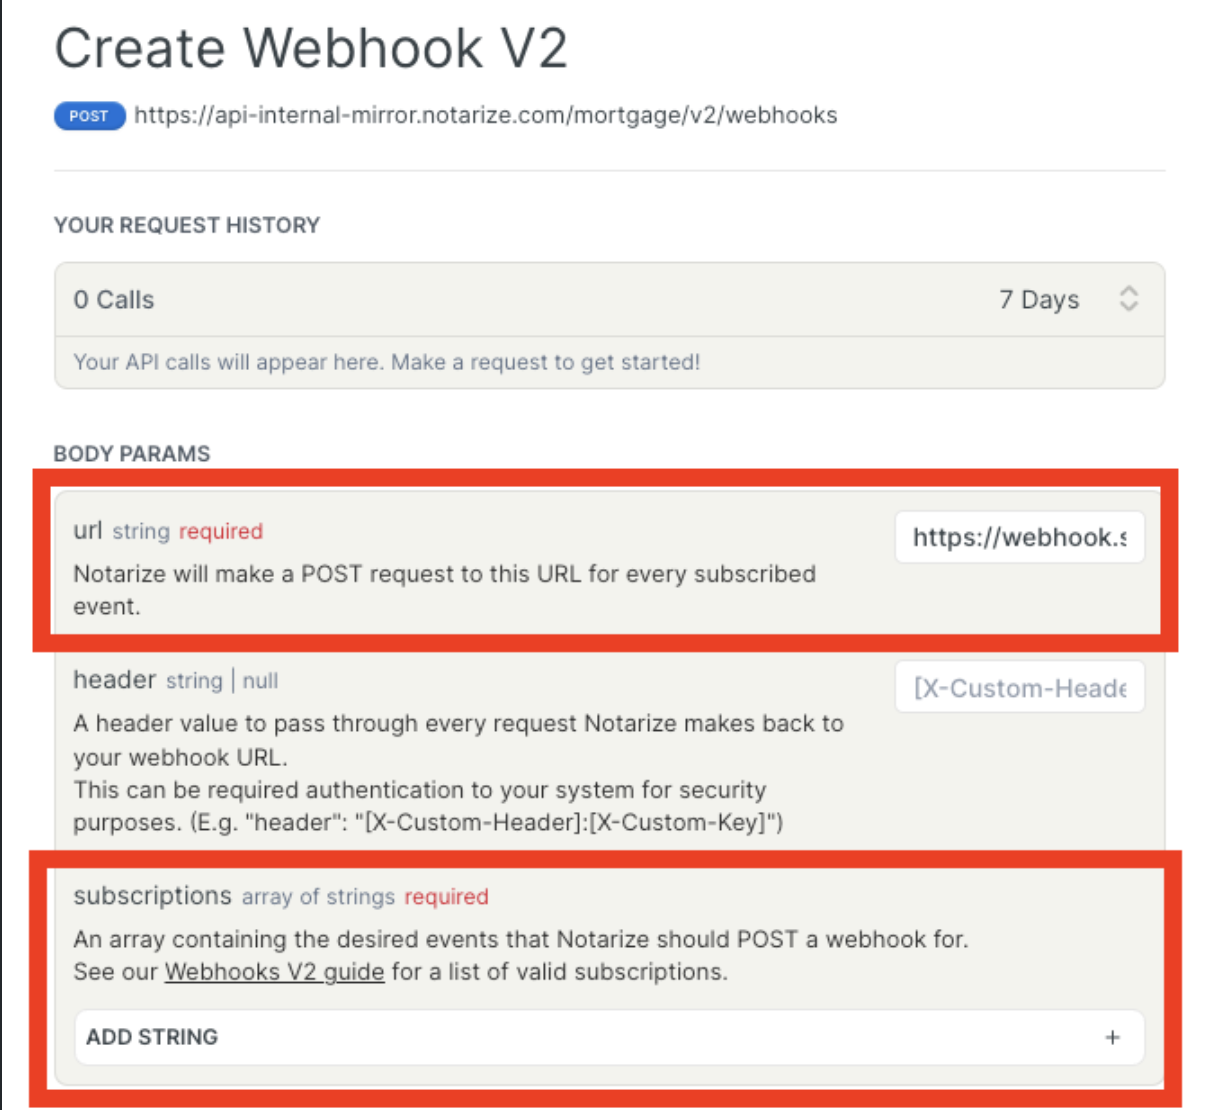
For testing purposes, we will subscribe to transaction webhook events only, which would be the string “transaction._”, the _ indicating all. If we also wanted to subscribe to notary events, we would include “_notary.__". Additionally, if you wanted to subscribe to every event, you can just subscribe to “*”.
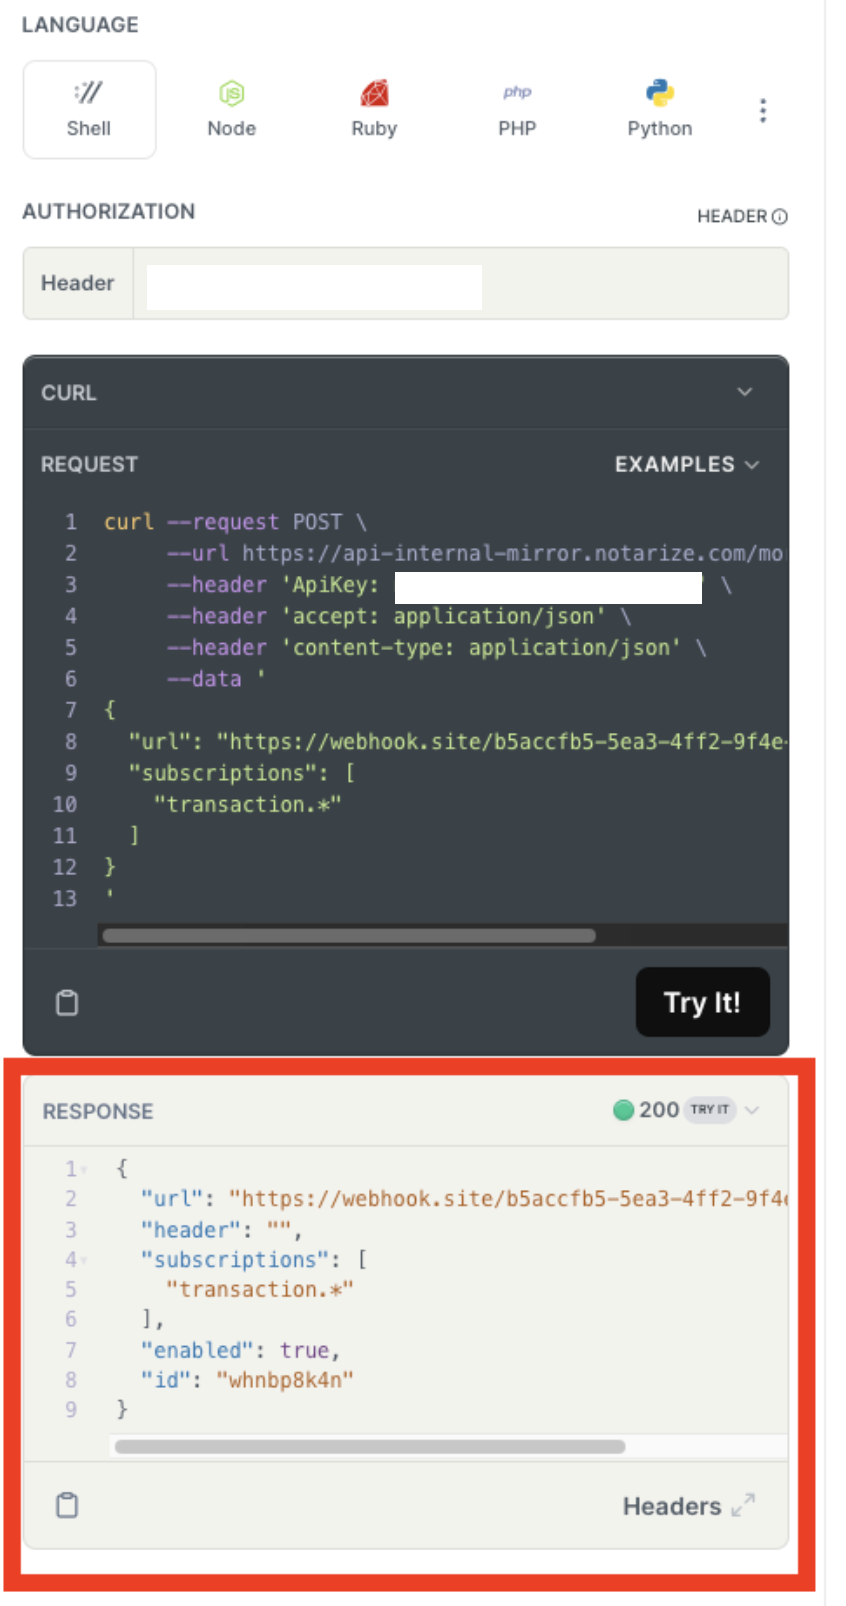
Now that I have all of my required information, I’m ready to send the request by clicking the “Try It!” button:
If the request is successful, you will see a response of 200, along with the response body containing your unique webhook URL, an array showing your list of subscriptions, whether or not the webhook subscription is enabled, and a unique ID for the webhook subscription:
Subscribing to Webhook Events using Postman
Assuming you already have Postman installed, you would create a new request and set that request up accordingly:
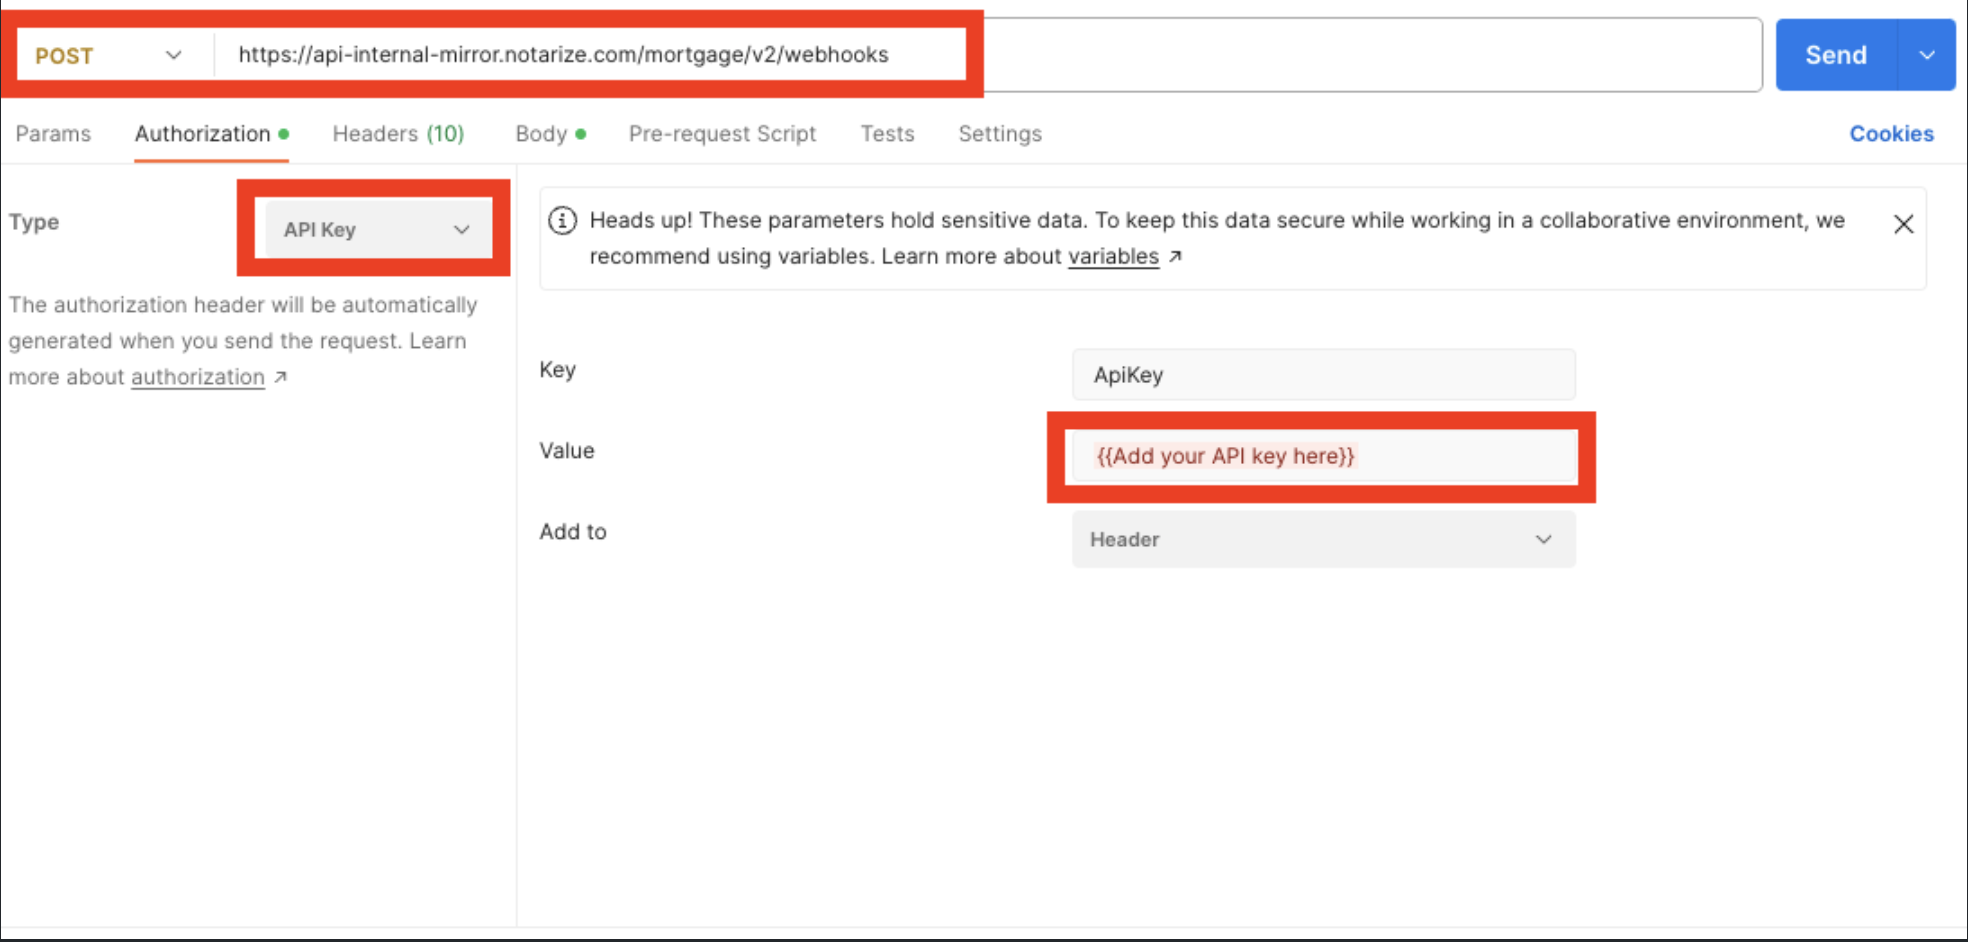
Make sure the method you’re using is POST, then input the correct URL. In the Authorization tab, choose API Key as the Type, then for the Value, input the API key from your org.
Now, switch over to the Body tab, and for this test, we’ll use the “raw” format, which allows you to use JSON for your request body, which will look like this:
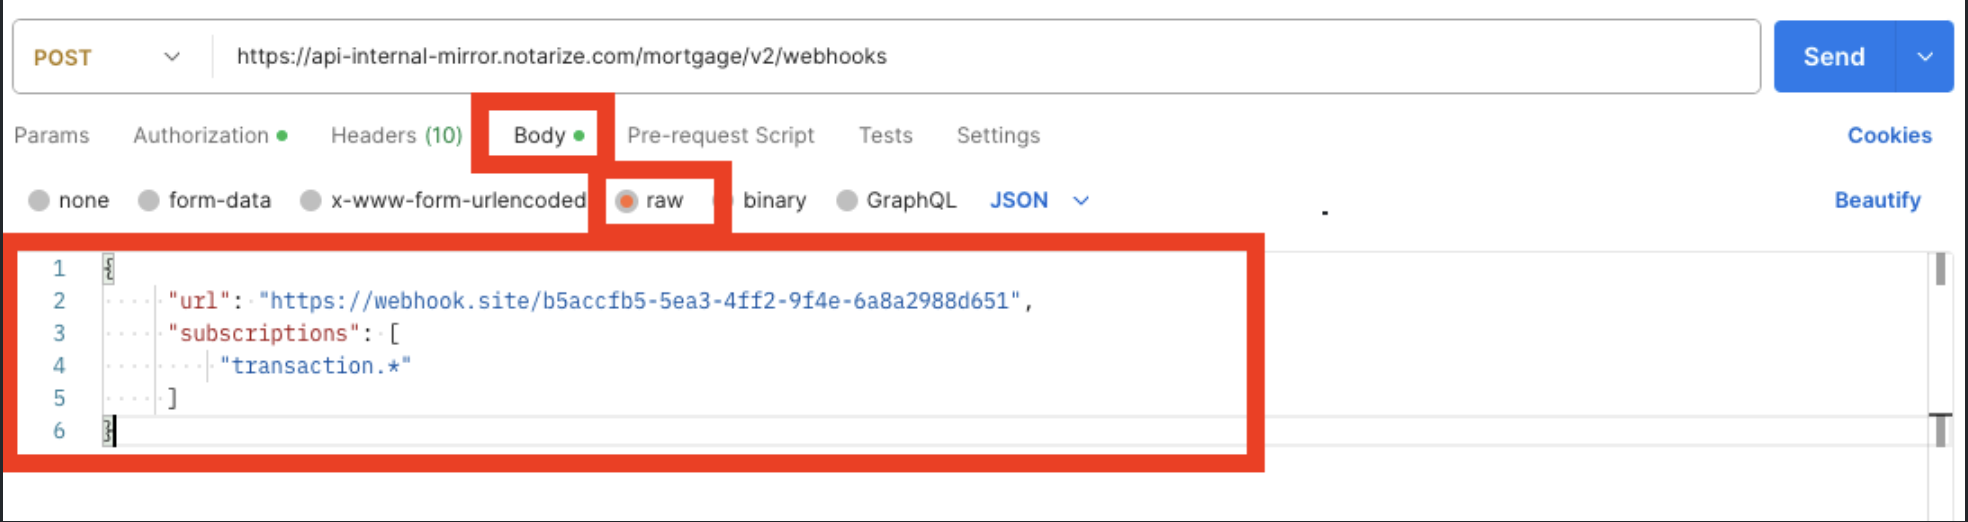
You can copy and paste the following JSON template and plug in your URL and subscriptions accordingly:
{
  "url": "<your unique webhook URL>",
  "subscriptions": [
        "transaction.*"
    ]
}
Once your request body is complete, click on Send to send the API call. Your response will populate under the request, and if successful, will show a 200 OK status, as well as the response body showing the URL, subscriptions, whether or not the subscription is enabled, and the unique ID of the subscription:
Generating Webhook Events
Now that we’ve created our subscriptions, we can test out webhooks!
To trigger webhook events, we simply just need to complete actions like create a transaction, add documents, send to title/closing ops/signer, etc. Each time we complete these actions, a webhook event is fired off to our unique webhook URL, where it will populate in the “Requests” column on the webhook.site page for your unique URL.
For descriptions of all of the different webhook events, and what types of event will trigger them, see the Webhooks V2 Guide.
As an example, if I create a transaction I will see the following event:
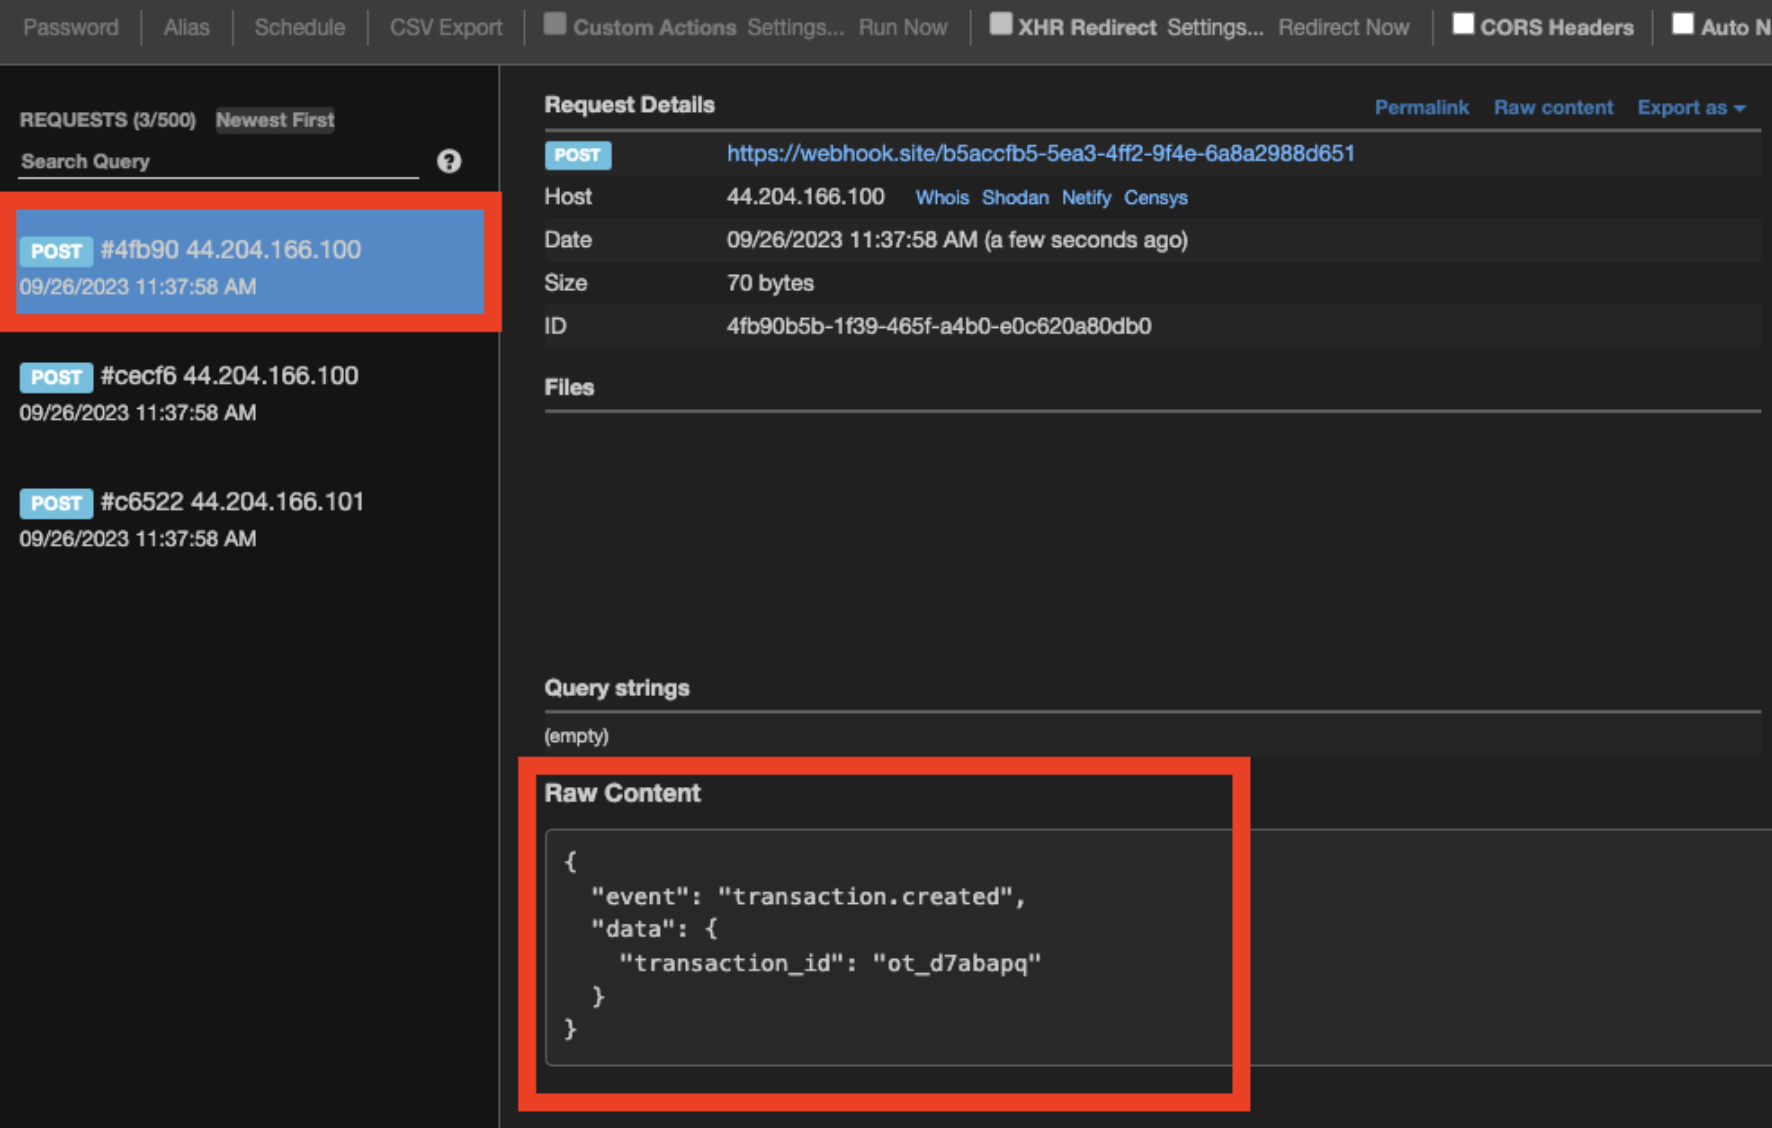
The other two events in the above screenshot are transaction.document.upload events, as my API call to create the transaction included two documents in the request body.
Validating Webhook Subscriptions
Now that you’ve subscribed to webhook events, and even generated some, how do you validate the subscriptions you have?
Using List Webhook V2 endpoint will provide a response containing the same information you were given when you originally created your webhook subscription. If you have more than one webhook URL created, it will list all of them in the response from this endpoint:
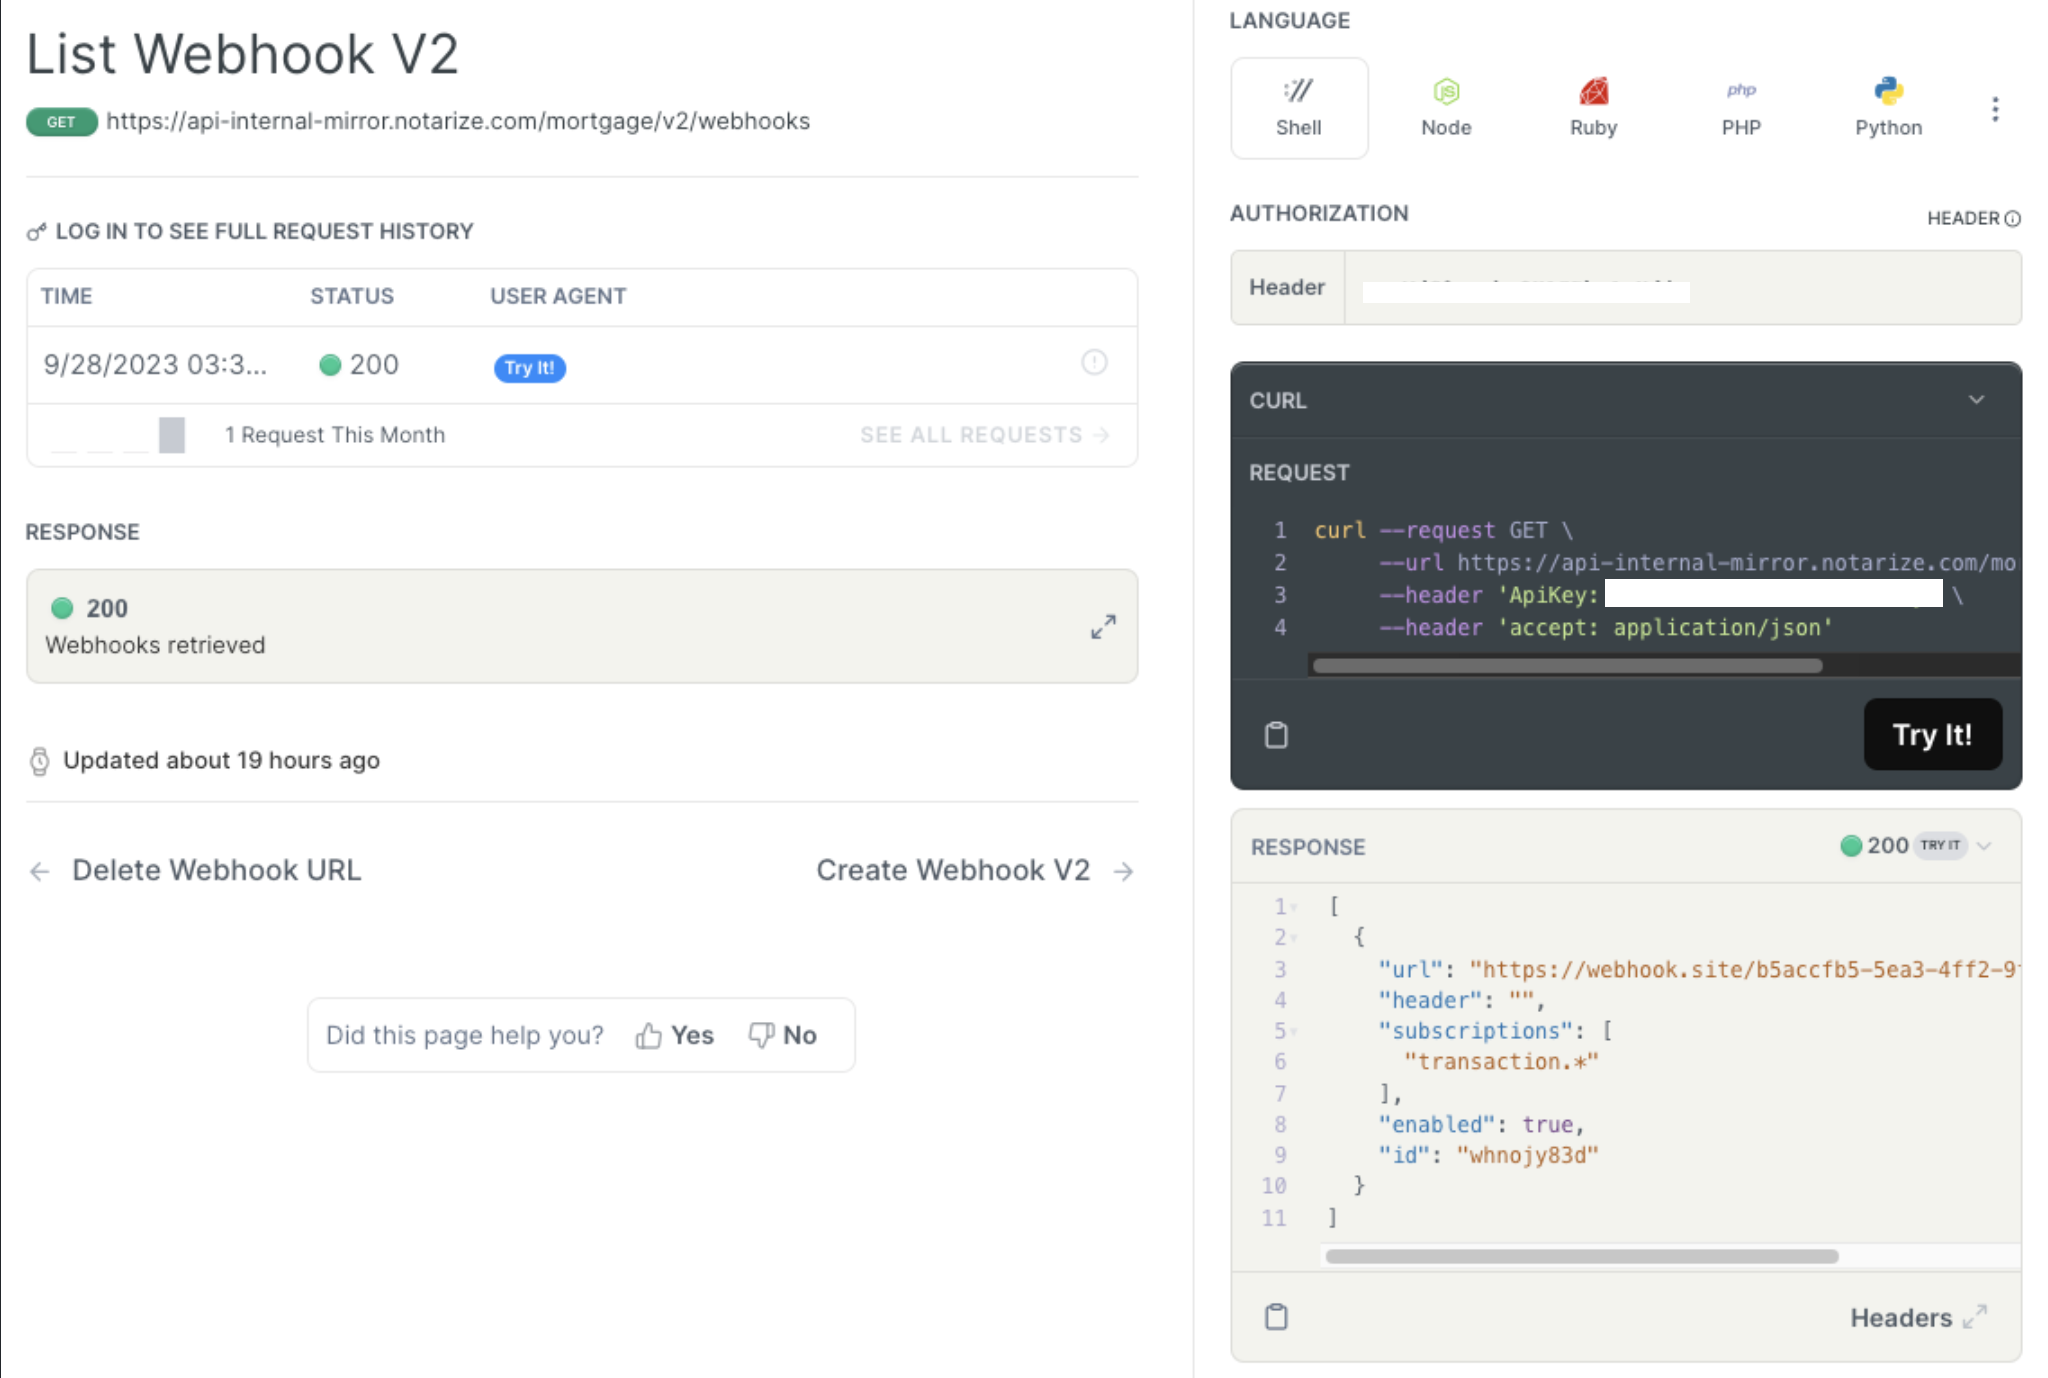
If you want to update your existing webhook subscriptions, or the URL you’re using, you can use the Update Webhook V2 endpoint which uses the PUT method. You will need the webhook ID from the above endpoint response (List Webhook V2), which in this example, would be “whnojy83d”.
Additionally, you can use the Get Webhook V2 Events endpoint to validate what events have been sent to your webhook URL. You will need the webhook ID here as well:
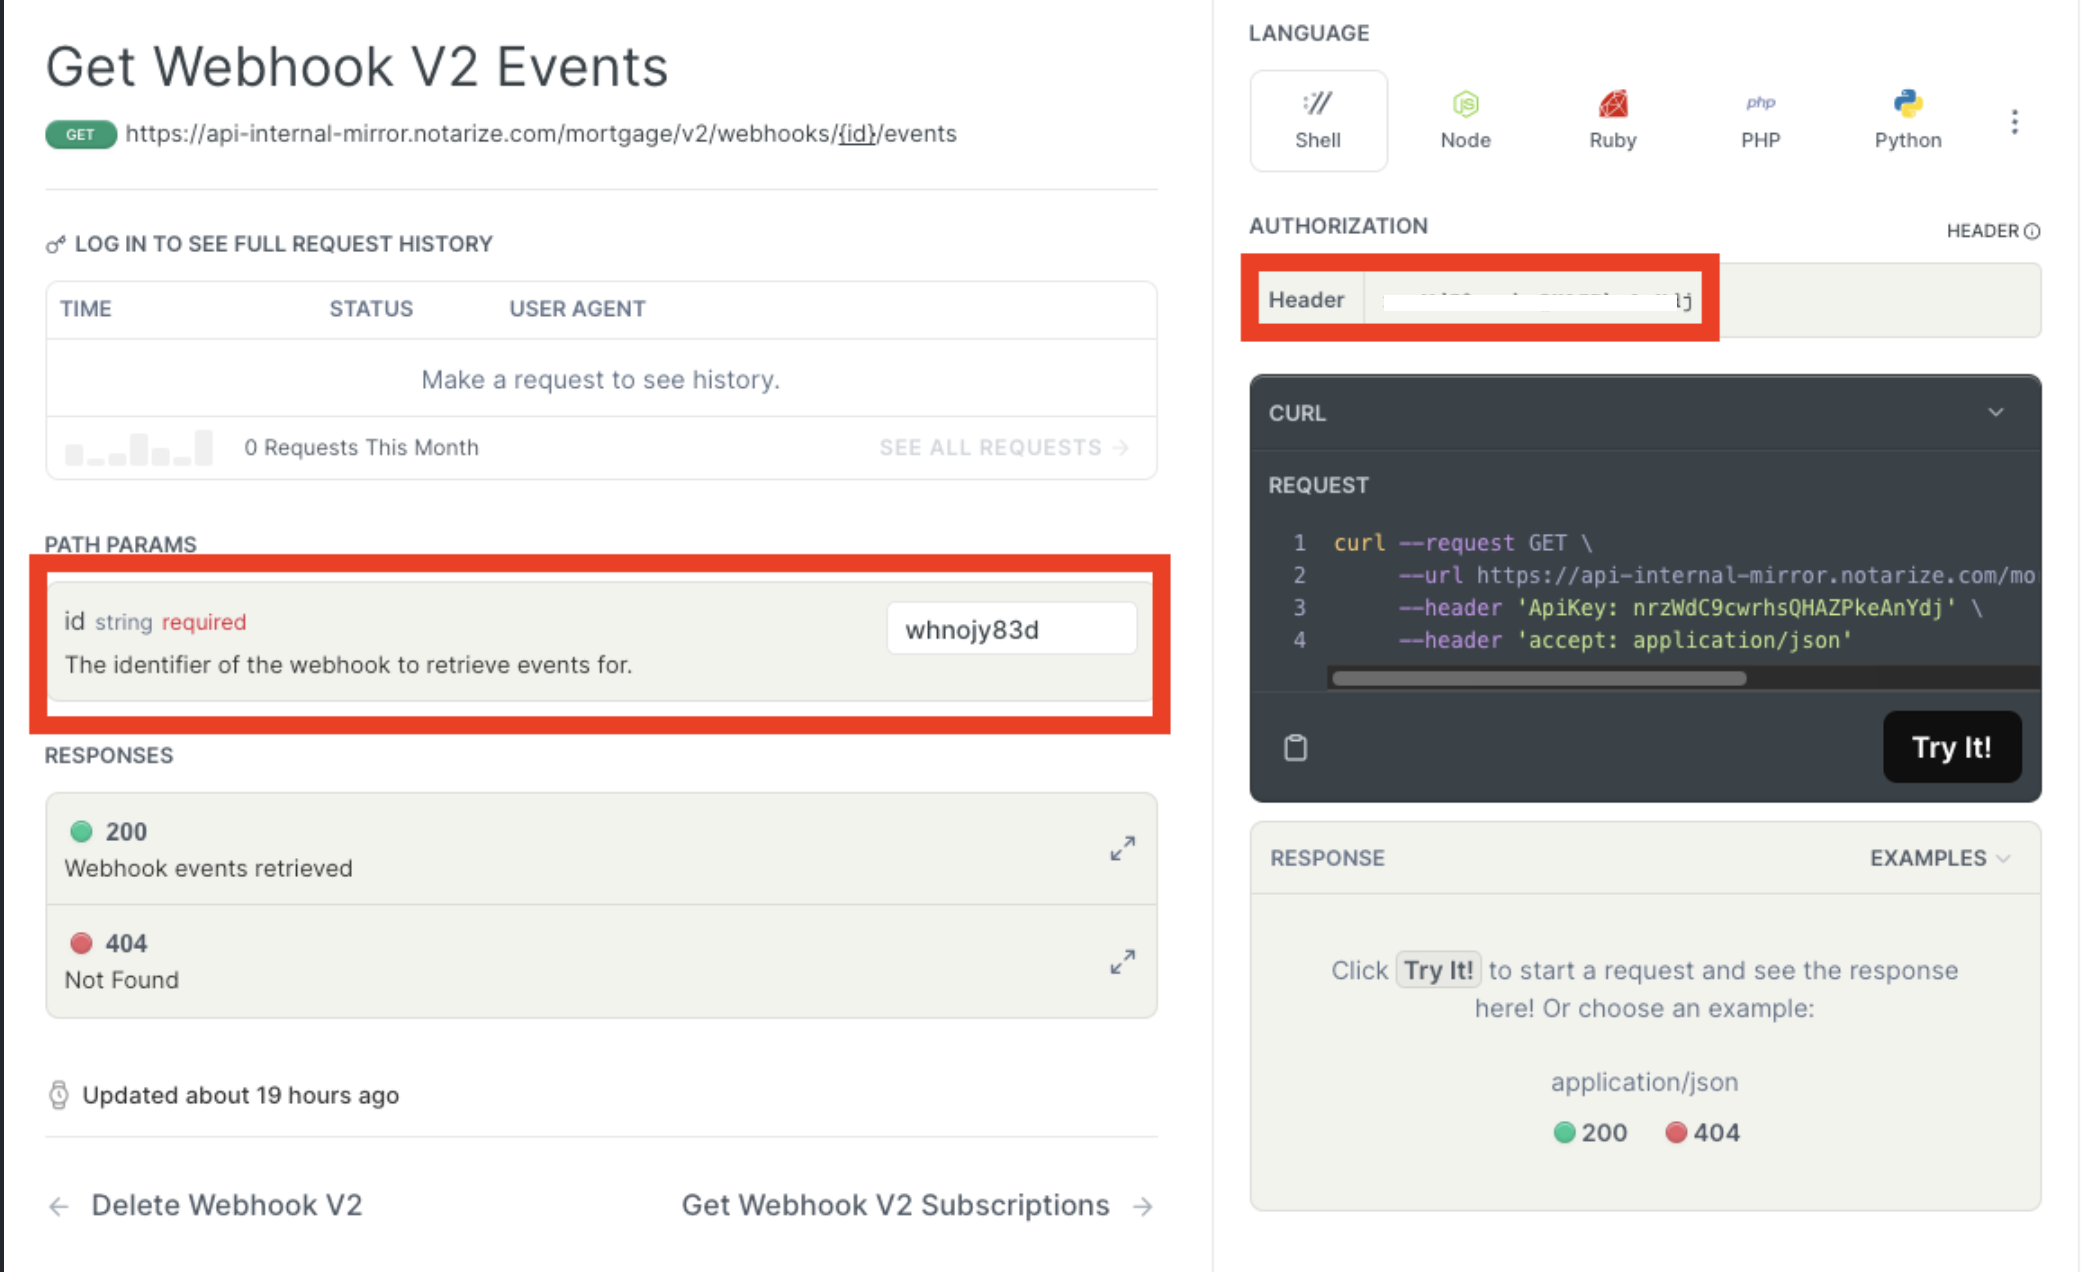
Here is the response that is provided:
[
  {
    "event": "transaction.created",
    "response": {
      "body": "",
      "code": 200,
      "headers": {
        "date": "Tue, 26 Sep 2023 18:27:23 GMT",
        "vary": "Accept-Encoding",
        "server": "nginx",
        "x-token-id": "b5accfb5-5ea3-4ff2-9f4e-6a8a2988d651",
        "content-type": "text/plain; charset=UTF-8",
        "x-request-id": "361d9d8d-1cc7-42fb-a6fb-5dab55a8dcea",
        "cache-control": "no-cache, private",
        "transfer-encoding": "chunked"
      }
    },
    "delivered": "2023-09-26T18:27:23.408Z",
    "payload": "{\"event\":\"transaction.created\",\"data\":{\"transaction_id\":\"ot_npryryk\"}}"
  },
  {
    "event": "transaction.document.upload",
    "response": {
      "body": "",
      "code": 200,
      "headers": {
        "date": "Tue, 26 Sep 2023 18:27:23 GMT",
        "vary": "Accept-Encoding",
        "server": "nginx",
        "x-token-id": "b5accfb5-5ea3-4ff2-9f4e-6a8a2988d651",
        "content-type": "text/plain; charset=UTF-8",
        "x-request-id": "49fc3c41-cb1b-4168-b949-2cd42d70b14d",
        "cache-control": "no-cache, private",
        "transfer-encoding": "chunked"
      }
    },
    "delivered": "2023-09-26T18:27:23.405Z",
    "payload": "{\"event\":\"transaction.document.upload\",\"data\":{\"transaction_id\":\"ot_npryryk\",\"organization_name\":\"Batman\",\"document\":{\"document_id\":\"do_b8f2e6b4-713b-48ef-a214-8c08cdce3a7a\",\"name\":\"Doc Requiring Notarization\"},\"date_occurred\":\"2023-09-26T18:27:22Z\"}}"
  },
  {
    "event": "transaction.document.upload",
    "response": {
      "body": "",
      "code": 200,
      "headers": {
        "date": "Tue, 26 Sep 2023 18:27:23 GMT",
        "vary": "Accept-Encoding",
        "server": "nginx",
        "x-token-id": "b5accfb5-5ea3-4ff2-9f4e-6a8a2988d651",
        "content-type": "text/plain; charset=UTF-8",
        "x-request-id": "096be763-1b7b-453c-906d-f29ab5fc4cae",
        "cache-control": "no-cache, private",
        "transfer-encoding": "chunked"
      }
    },
    "delivered": "2023-09-26T18:27:23.228Z",
    "payload": "{\"event\":\"transaction.document.upload\",\"data\":{\"transaction_id\":\"ot_npryryk\",\"organization_name\":\"Batman\",\"document\":{\"document_id\":\"do_34454f4c-75c7-4504-a268-00bca05cda2d\",\"name\":\"eSign-able Document\"},\"date_occurred\":\"2023-09-26T18:27:22Z\"}}"
  }
]
Updated 7 months ago