
Features
There are many different features available in Proof, whether on our business platform, or our real estate platform. Below is a list of commonly used features, complete with the platform they're available on, any prerequisites, and a brief explanation of what they do.
Real Estate Collab
Platform: Lender
Prerequisites: N/A
Real Estate Collab is a feature that allows lenders to collaborate with title companies, all on the Proof platform.
When creating a transaction, the lender can select a title company to work with using our title agent lookup in the UI, or by using our eligibility API endpoint. Once the title company is chosen, the lender can send the transaction to the title company, who can then upload their documents using the Proof Title UI, and send to our closing operations team. Alternatively, if the lender or title company opt-out of using our closing operations, the title company can self-tag and send directly to the signer.
Note: Hybrid transactions in a real estate collab workflow will NOT go to title or closing operations. Hybrid transactions will go from the lender, straight to signer.
Non-Onboarded Title
Platform: Lender
Prerequisites: Real Estate Collab enabled
Non-Onboarded Title allows a lender to work with title companies that are not currently utilizing the Proof platform.
Once enabled, you can define the title company as a title contact on the transaction instead of being required to choose an existing title company. You define the title contact using a first and last name, as well as an email address. An email will be sent to the defined email address, letting them know they’ve been added to a transaction. From here, they will be able to join the Proof platform and complete their onboarding and once complete, they can collaborate on the transaction and add their documents.
Lender Title Fee Collab
Platform: Lender
Prerequisites: Real Estate Collab enabled
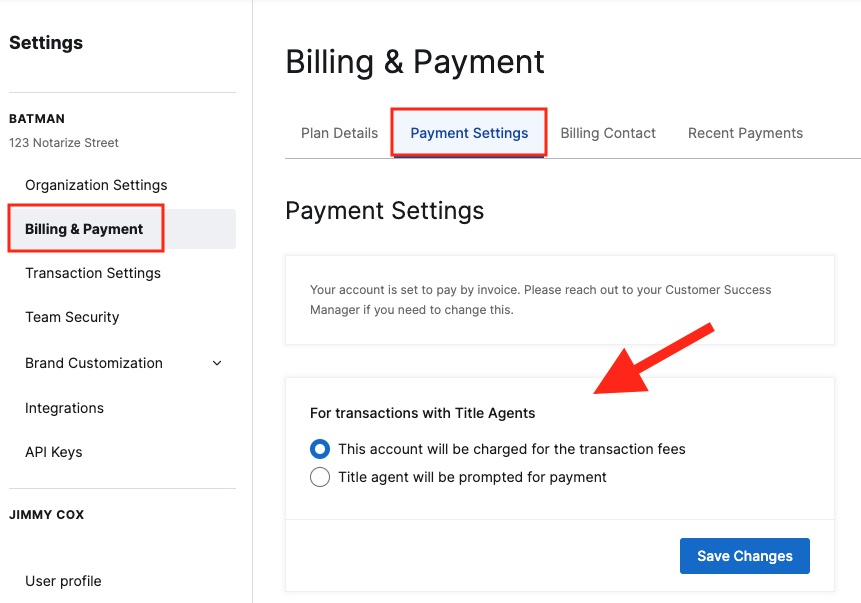
Enabling this setting will provide a setting to lenders where they can choose to cover the fees in a real estate collaborative transaction (where lender sends the transaction to title and adds their documents. See Real Estate Collab for more details) or to prompt the title company for payment.
See below for what the setting that will surface for the lender when they go into their Payment Settings:
Engagement Signer Nudge Cadence
Platform: Business
Prerequisites: N/A
When enabled, this setting will override the default cadence for the “Jenny” reminder emails, and allow you to define your own cadence for these emails. You can define three values, i.e., you want the reminder emails to go out after 24 hours, 48 hours, and 72 hours.
Note: The “Jenny” emails are the automated emails that Proof sends to signers on business transactions when they have not completed their transaction within a specific amount of time.
To enable this setting, reach out to your point of contact at Proof and provide the cadence you would prefer, as this is a setting that Proof would have to enable on your behalf.
Document Templating
Platform: All
Prerequisites: N/A
There are different templating options available when using our business platform as opposed to our real estate platform.
Business
By default, document templates are available to business organizations.
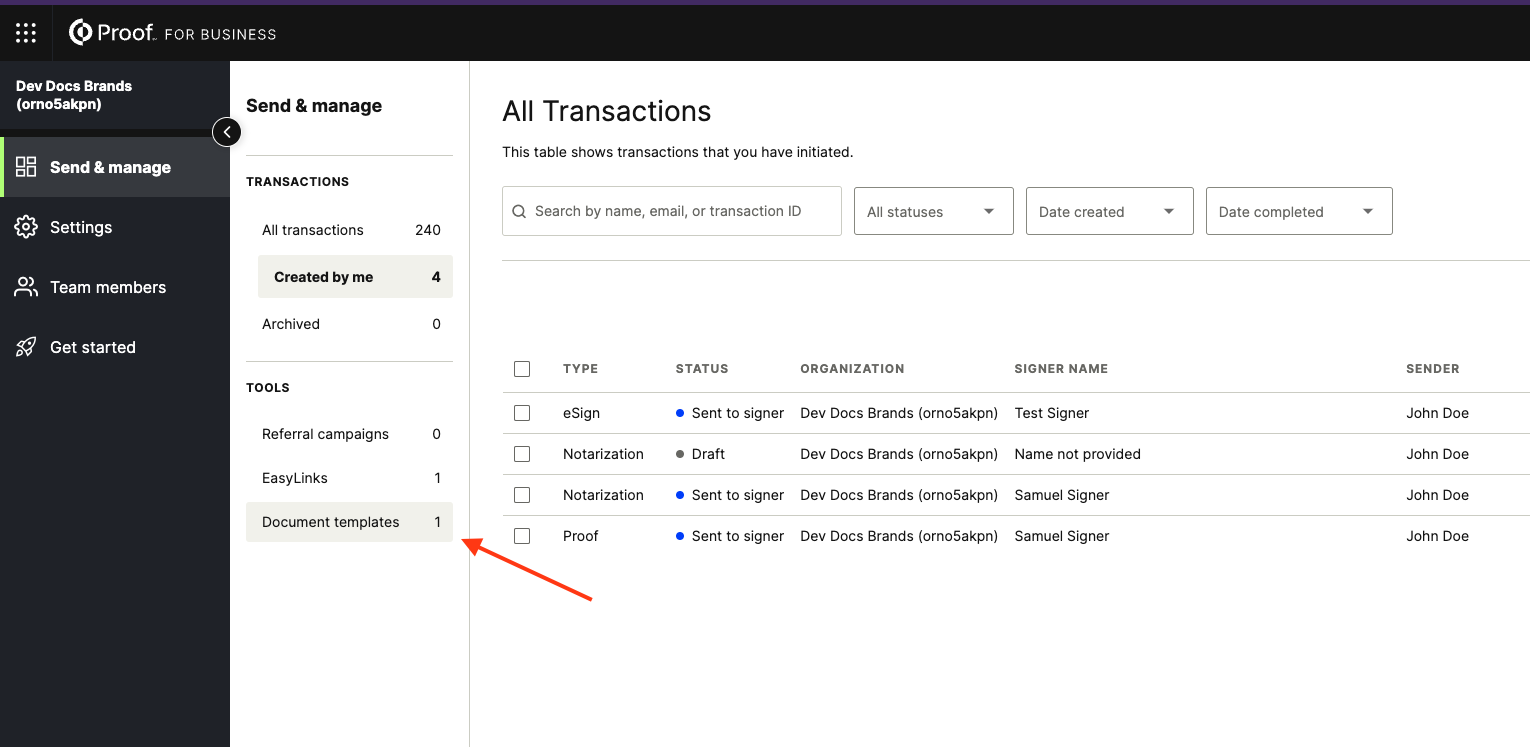
When you log in to the business portal, you will see a “Tools” section on the navigation menu on the left where you can create/review your templates:
These templates can be used for documents being used for EasyLinks or in transactions created via API.
Creating the template consists of uploading a document, then applying designations for signers and notaries. Once saved, you are free to use those templates in your transactions.
See the articles before for more in-depth instructions on creating and using business templates:
Create Document Templates
Using Document Templates
Real Estate
There are two separate templating features for Real Estate. One for documents that are manually uploaded to a Proof transaction using our UI. The other is for documents being added to Proof transactions using the API.
If you want to implement real estate templates, this is a feature you will need to ask Proof to enable for you. You will also need to provide PDFs of all documents you would like templated so our templating team can create and add those templates to your account.
Note: It is best to send PDFs that are NOT scans, as scanned documents may cause improper placement of designations due to the nature of scanning (physically placing the document in/on a scanner or using a scanning app on a mobile device will not appear exactly the same as the original PDF).
Templating does not require the use of our closing operations team, though it is recommended, as they will quality control the documents to ensure designations were correctly applied.
Place an Order
Platform: Title
Prerequisites: N/A
Place an Order is a title-level setting that enables the use of our Closing Operations team. When enabled, a title company would create their transaction (or they would receive a lender-initiated transaction via the Real Estate Collab workflow), upload their documents and then click the “Place Order” button.
Clicking “Place Order” will send the transaction to the Closing Operations team, who will then tag and quality-control (QC) the transaction, documents included. Closing Operations will send the transaction to the signer once complete.
With Place an Order turned off, the “Place Order” button instead says “Send Transaction”, which sends the transaction to the signer. If Place an Order is disabled, the title company will have to
either tag their own documents or use our real estate templating.
Place an Order Lenders
Platform: Lender
Prerequisites: N/A
Much like Place an Order, Place an Order Lenders enables the use of our Closing Operations team, but at the lender level.
If a lender is not using Real Estate Collab, and has Place an Order Lenders enabled, then once the lender has created the transaction and added documents, they would click the “Place Order” button to send to Closing Operations to have the transaction and documents QC’ed and tagged if needed.
If a lender IS using Real Estate Collab, and has Place an Order Lenders enabled, then the lender would create the transaction and add documents, click “Send to Title Agency” so title can add their documents, then once their documents are added, title will click “Place Order” to send to Closing Operations.
Note: In a Real Estate Collab workflow, if a lender has Place an Order Lenders enabled, and the title company they are collaborating with has Place an Order disabled, the lender setting will take precedence, forcing the title company to send to Closing Operations.
Limit Document Visibility
Platform: All
Prerequisites: N/A
Enabling this setting will ensure that in transactions where there are multiple signers, those signers can only see documents that they should be allowed to see, i.e., they will only have visibility into documents where they have signing designations.
As a signer, I will only see documents where I have assigned designations, and I will not be able to see documents where other signers have designations, but I do not. If there are no signer designations present on a document, that document will be visible to all signers.
This setting is at the organization level, meaning it will apply to all transactions created by an organization.
Suppress Signer Emails
Platform: All
Prerequisites: N/A
Enabling this setting will stop any automated emails from the Proof platform that go to signers, such as transaction activation emails when the transaction is sent to signer, or on the real estate side, emails informing the signer that their scheduled closing is coming up.
An organization may want to suppress these signer emails in a scenario where they are integrated with the Proof API, and retrieving the transaction access link via the API to embed in a singer-facing portal. An organization may also want to suppress the automated signer emails so they can send their own emails to signers containing the transaction access link.
Enable Child Organizations
Platform: All
Prerequisites: N/A
Enabling this setting allows an organization to create subsidiary accounts, or child organizations. It creates a parent/child hierarchy.
This is helpful in scenarios where an organization may create an account for the entire business, but want subsidiary accounts for different branches of the business. Another example would be a lender who absorbs, or acquires another lending company (already existing on the Proof platform or newly onboarded) and wants to have visibility into that absorbed lending company’s Proof account (team members, transactions, etc).
Note: Child organizations can also have their own child organizations (i.e., sub-child accounts, or grandchildren).
Allow Credible Witness
Platform: All
Prerequisites: N/A
Enabling this setting will give you the ability to add a credible witness to the transaction. This may be necessary in the event that a signer does not have a Social Security number, or they have limited credit history that would prevent them from passing knowledge-based assessment (KBA).
Real estate organizations (lender, title) must receive underwriter approval for credible witness use and is only available for the following states: Alaska, Arizona, Arkansas, Colorado, Idaho, Indiana, Iowa, Kansas, Kentucky, Maryland, Missouri, Montana, Nebraska, Nevada, New Hampshire, New Jersey, New York, North Dakota, Ohio, Oklahoma, Oregon, Pennsylvania, Texas, Washington, West Virginia, Wisconsin.
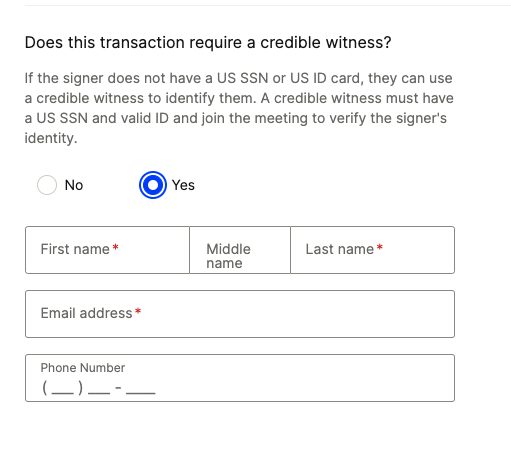
To add a credible witness, you would click on the “Yes” radio button under the prompt seen in the screenshot below, then add the required information for the witness. This prompt is found below the signer’s details when the transaction is in a draft state.
When a credible witness is added to the transaction, the signer will not be required to go through KBA. They will request a notary meeting, and once they join, the witness will receive an email notification providing them with a link to join, where they will need to go through KBA and then act as a witness for the signer. When there is a credible witness on the transaction, the notary will not proceed with the signing of documents until the witness is present.
Note: In its current state, a credible witness can only be added to a transaction using the Proof UI. The witness cannot currently be added via the API. Additionally, in the case of a multi-signer transaction, if a credible witness is added, they will need to be present as a witness for ALL signers on the transaction (even in split signings, where the signers are signing during their own separate notary meetings).
Use Company Notaries
Platform: All
Prerequisites: N/A
Enabling this setting will allow an organization to use their own notaries, which we refer to In-House Notaries (IHN).
Once enabled, you will be able to invite members of your organization as notaries, where they will need to go through our notary compliance process before taking any meeting requests. Once your notaries are onboarded, your transactions will default to your IHN’s. You can assign transactions to specific notaries using the UI as well as the API, which will notify the assigned notary via SMS text message when the signer requests a meeting. You can also leave the transaction unassigned, which will ring all of your available notaries, but none of those notaries will receive an SMS message.
Note: Assigning a notary to a transaction is not a “hard” assignment, meaning that once the signer requests a notary meeting, it will also ring to your other available notaries. Assignment only determines who receives the SMS message when the meeting is requested, and who has that meeting listed on the “My Assigned Meetings” page in the Proof UI.

Allow Org Notary Overflow
Platform: All
Prerequisites: Use Company Notaries enabled
Enabling notary overflow will allow notary meetings to roll over to the Proof Notarize Network (aka the on-demand notary/ODN queue) when a defined threshold has been reached.
This is helpful when your meeting volume is higher than your current onboarded notaries can handle. Signers will wait in your in-house notary queue until the threshold is reached, then they will be routed to the On-Demand Notary queue. An additional setting is surfaced when you enable Notary Overflow that allows you to define how many minutes signers will wait in your notary queue before rolling over to the ODN queue. When requesting overflow to be enabled, be sure to provide a value for the overflow threshold as well.
One additional ability you gain from enabling notary overflow is the ability to assign a transaction directly to the Notarize Network when creating the transaction.
You can choose an internal notary as you normally would when using your own company notaries, or you allow Proof to conduct the meeting, which will route the meeting request directly to our On Demand Notary Network.
Enable Parent Org Notary Assignment
Platform: All
Prerequisites: Use Company Notaries enabled
Enabling this setting will allow child organizations to make use of their parent organization’s in-house notaries.
When assigning a transaction to a notary, the child organization will be able to assign in-house notaries from their parent organization’s account.
Allow Hard Notary Assignment
Platform: All
Prerequisites: Use Company Notaries enabled
Enabling this setting will turn notary assignment into a “hard” assignment. This means that when you assign a notary to a transaction via the UI or API, the notary will receive the SMS text message upon meeting request as they normally would, but now, the meeting request will only ring to the assigned notary. The request will not ring to any of your other available notaries.
Allow Personally Know to Notary
Platform: All
Prerequisites: Use Company Notaries enabled
Enabling this setting will allow signers to bypass the multi-factor authentication process of KBA (Knowledge-based assessment) and credential analysis. Instead, the notary’s personal knowledge is relied on as proper identification. There is a setting on the transaction that allows you to enable this at the transaction level, as seen below:
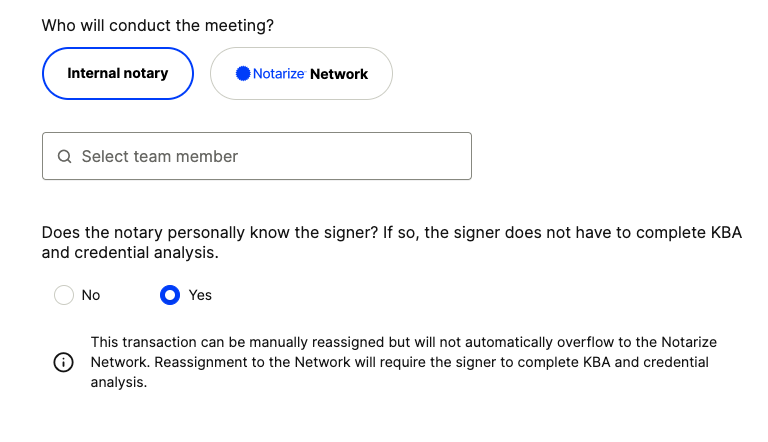
This feature is only available to organizations using In-House Notaries, and transactions using Personally-Known-To-Notary will not overflow to the Proof On-Demand Notary Network.
Concurrent Signing
Platform: All
Prerequisites: N/A
Enabling this setting will allow multiple signers who are not co-located to join the same notary meeting instead of each signer needing to have their own, individual notary meeting (split signing). In its current form, concurrent signing would disable the sign-ahead feature for signers who aren’t co-located, meaning that ALL documents would need to be signed during the notary meeting, not just documents that require notarization.
For title-initiated transactions, the setting would need to be enabled in your title organization. For title companies using their own notaries and doing lender-initiated transactions, this feature would need to be enabled at both the lender AND the title level.
Proof can also optionally disable the ability for signers to continue without all signers being present - if needed, please contact [email protected] and request that Allow Split Signing with Concurrent Signing Enabled is disabled.
Custom Branding
Platform: All
Prerequisites: N/A
Custom branding is enabled by default for all accounts. To customize your branding, you can click on your name in the top right corner→click Account Settings→and expand the Brand Customization menu on the navigation bar on the left.
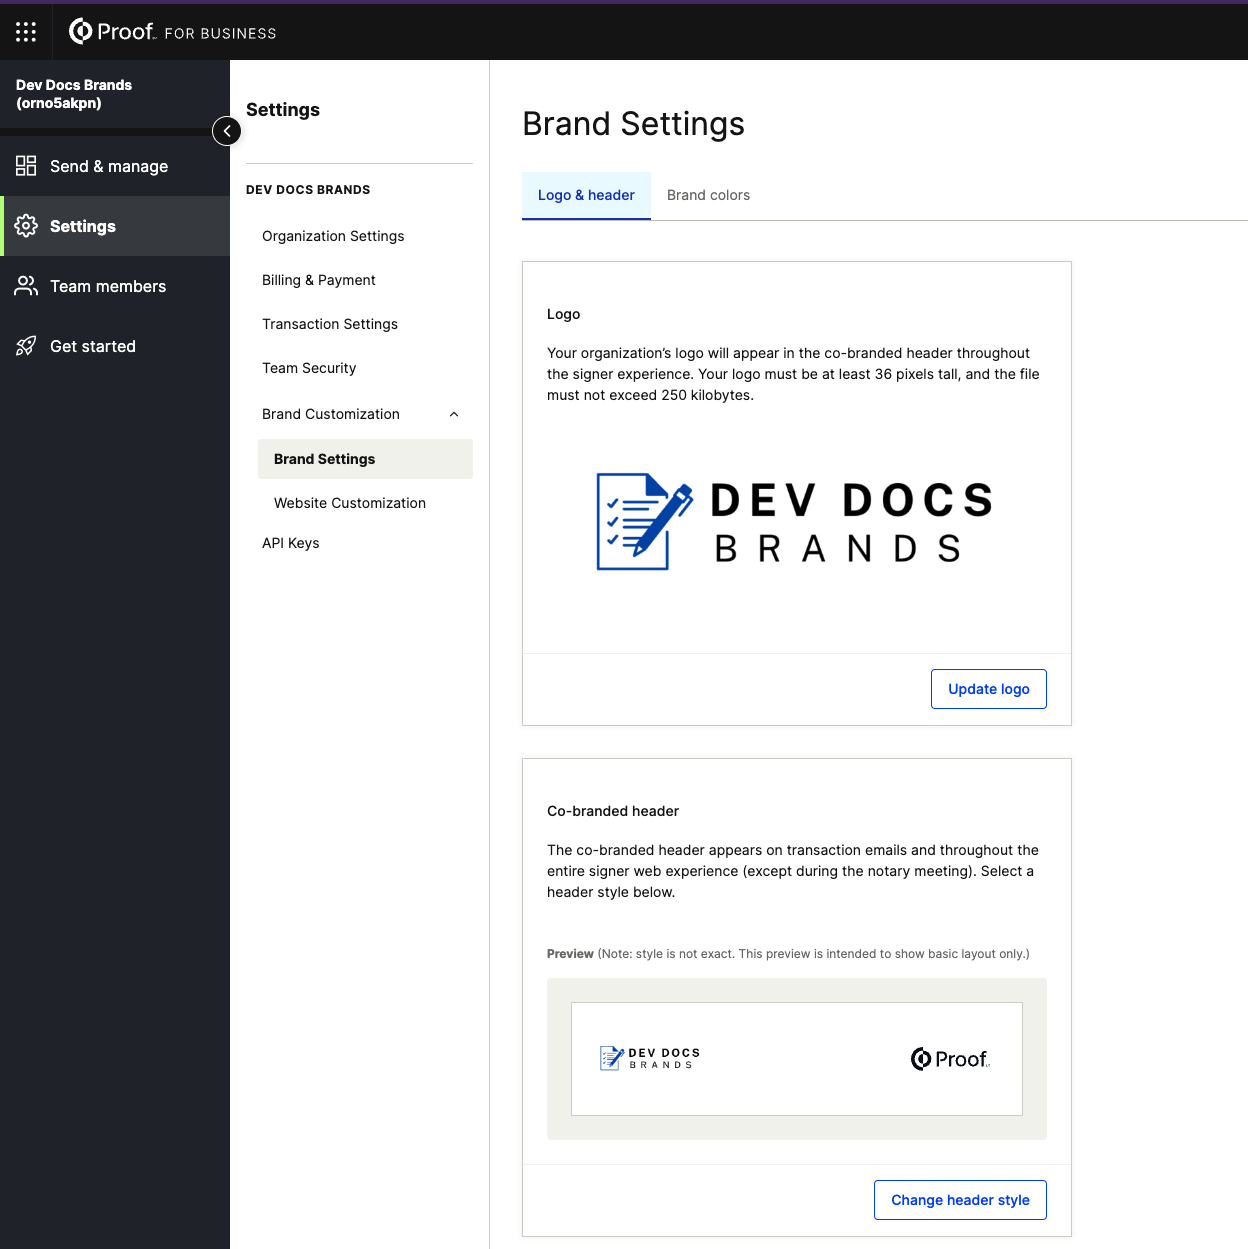
Here, you can upload your logo, change your co-branded header style, configure your brand colors, or even customize the signer landing and login page!
In order to access these settings, you will need to have admin access to the organization account.
Batch Signing
Platform: All
Prerequisites: N/A
This setting is enabled by default.
When enabled, signers are presented with a button to “Sign Now”:
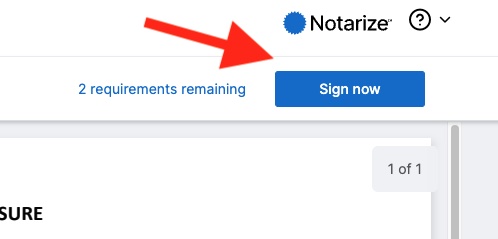
Once you click Sign Now, all batch-signable designations (signatures, initials, date) on the current document will be filled out automatically. A success message will appear, it will inform you that the document requirements have been fulfilled. You can then move on to the next document. Batch signing is available in both sign-ahead (pre-meeting workflow) and during the notary meeting.
If this setting is disabled, then signers will need to scroll through the document and click each individual designation to populate their signature, initials, or the date.
Updated 6 months ago